
使用 HTML 地标角色改善无障碍性
确保所有用户都能访问您的网站非常重要,包括那些使用屏幕阅读器等辅助技术的用户。实现这一目标的一种方法是使用 ARIA 地标角色,帮助屏幕阅读器用户轻松浏览您的网站。使用地标角色还有其他好处,例如改进 HTML 的语义并使您的网站更容易进行样式设置。在这篇博文中,我们将通过一个简单的示例,更深入地探讨这些地标以及如何在您的网站上使用它们。
什么是 HTML 地标角色?
在 ARIA(Accessible Rich Internet Applications)规范中,地标被定义为页面中用户可能希望快速访问的区域。虽然规范中并未明确指出这专门针对屏幕阅读器用户,但他们确实是这些功能特别有用的用户群体。ARIA 规范中定义了八个地标角色。
bannernavigationsearchmainregioncomplementaryformcontentinfo
为元素分配特定角色的方法之一是使用元素上的 role 属性。例如:
<div class="banner" role="banner"></div>
虽然在某些情况下您可能需要显式设置元素的角色,但某些 HTML 元素本身就具有与之关联的角色。在本文的其余部分,我们将遵循 ARIA 的第一条规则,即:
如果您可以使用一个具有您所需语义和行为的原生 HTML 元素或属性,而不是重新利用一个元素并添加 ARIA 角色、状态或属性来使其可访问,那么请这样做。
如何使用地标角色
为了说明 HTML 地标的工作原理,我们将构建一个基本的网页,以改善屏幕阅读器用户在页面上的用户体验和可访问性。我们不会编写任何 CSS,而是专注于编写干净、语义化的 HTML。
将以下 HTML 保存到名为 index.html 的文件中,并在您喜欢的浏览器中打开它。
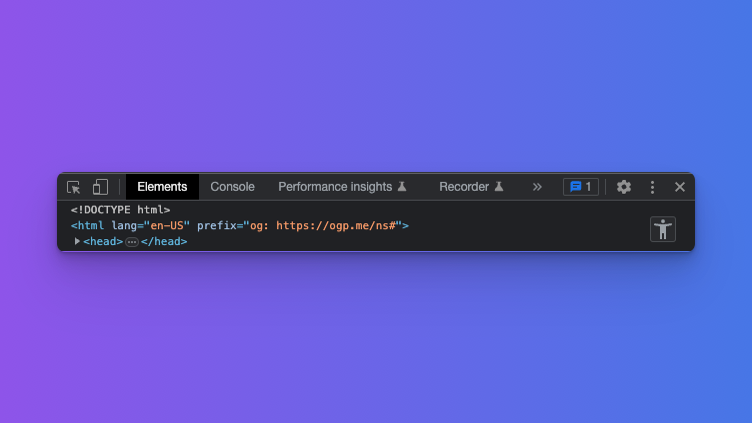
<!doctype html>
<html lang="en">
  <head>
    <meta charset="UTF-8" />
    <meta name="viewport" content="width=device-width, initial-scale=1.0" />
    <meta http-equiv="X-UA-Compatible" content="ie=edge" />
    <title>Mr. Pineapple's Pizzeria</title>
  </head>
  <body></body>
</html>
您应该会看到一个空白页面,浏览器标签页中显示标题“Mr. Pineapple's Pizzeria”。对于每个地标,我们将添加相应的 HTML 并检查可访问性树,以查看其变化。
横幅地标
横幅地标用于标识网页的头部,通常包含网站的徽标、导航和搜索输入。当 <header> 元素未用作 <main> 元素或其他分节元素的子元素时,它会被分配 banner 角色。
让我们通过向我们的页面添加一个横幅地标来看看效果。
<body>
  <header>
    <a class="logo" href="/">
      <span class="visually-hidden">Mr. Pineapple's Pizzeria</span>
    </a>
  </header>
</body>
刷新页面并打开开发人员工具。您访问可访问性树的方式将因浏览器而异。您可以按照下面的链接获取更多信息:
- Firefox
- Chromium(Edge、Chrome、Arc)
- 在 Safari 中,打开 开发人员工具(称为 Web Inspector)。在元素选项卡中选择一个元素。在最右侧,选择节点选项卡并展开可访问性部分。
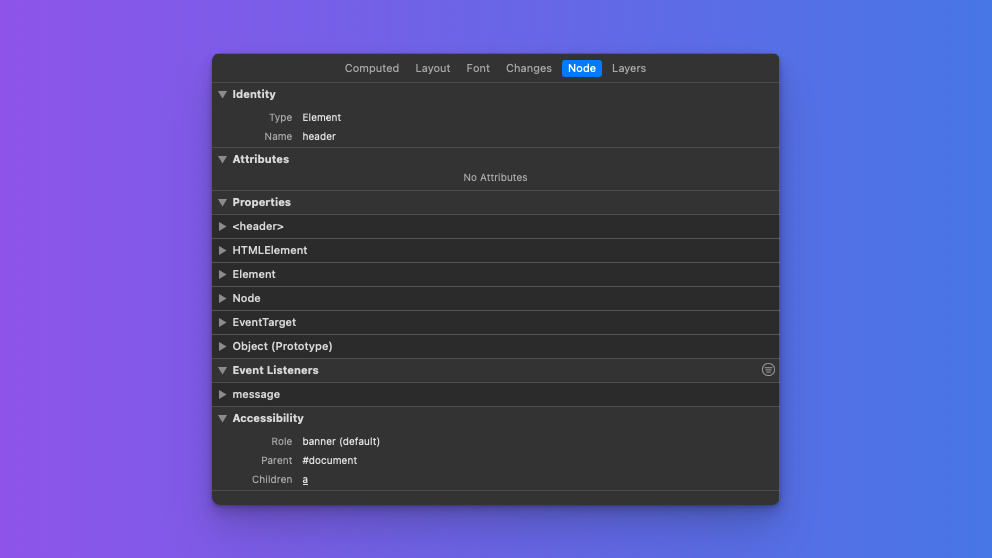
从屏幕截图中可以看到,当选中 <header> 元素时,角色显示为 banner。我们有个不错的开端!
注意:Firefox 开发人员工具的可访问性检查器将不会显示元素的适当角色。相反,它会将所有这些元素的角色显示为“landmark”。此问题已得到解决,并将集成到 Firefox 114 中。如果您使用的是Firefox for developers,该问题将已解决。
导航地标
navigation 地标用于标识一组链接,这些链接可帮助用户导航网页或相关网页。这可以包括侧边栏导航、站点主导航或页面页脚中的一组相关链接。
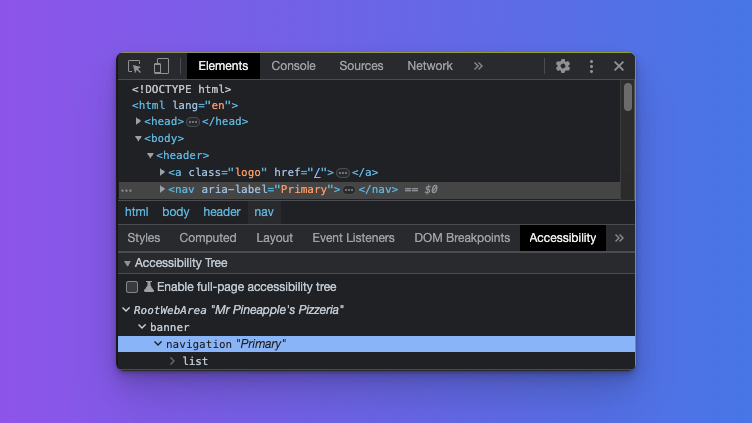
如前所述,页面头部中常见的元素之一是站点的初级导航。让我们为我们的页面添加一个:
<nav aria-label="Primary">
  <ul>
    <li><a aria-current="page" href="/">Home</a></li>
    <li><a href="/menu">Our pizzas</a></li>
    <li><a href="/contact">Get in touch</a></li>
  </ul>
</nav>
在这里,我们使用 <nav> 元素,因为它隐含地具有 navigation 角色。由于一个页面可能包含多个导航元素,因此为每个地标进行唯一标识非常重要。为此,我们使用 aria-label 属性,并为导航地标命名为“Primary”。
注意:当屏幕阅读器描述上述导航地标时,它将说“Primary navigation”。这就是为什么“navigation”一词不包含在
aria-label值中的原因。
如果您检查 <nav> 元素,您会注意到两件事:该元素被标识为导航地标,并暴露了我们使用 aria-label 指定的值。
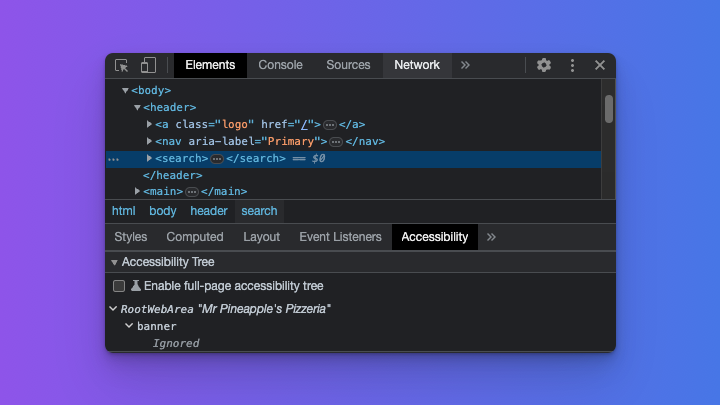
搜索地标
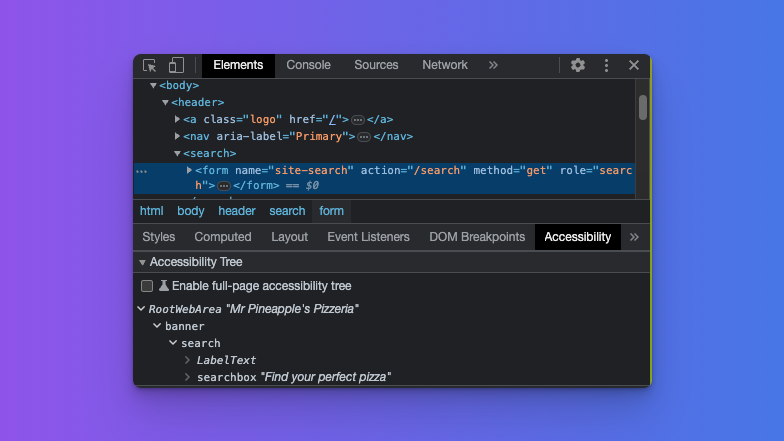
search 角色用于对一组相关元素进行分组,这些元素共同提供了一种搜索网站的方法。使用此角色的最常见方式是通过表单。
<form name="site-search" action="/search" method="get" role="search">
  <label for="query">Find your perfect pizza</label>
  <input type="search" id="query" name="query" />
</form>
在这里,我们遇到了第一个需要显式分配角色的实例。由于没有具有隐式搜索角色的原生 HTML 元素,因此在此示例中我们将角色分配给 <form> 元素。随着新 HTML 元素的引入,这一点将发生改变,我们将在本文稍后讨论。
如果您使用开发人员工具检查表单元素,您会发现它正确地将地标标识为搜索地标。
主内容地标
现在我们离开头部,进入页面主内容。这将引入下一个地标,恰当地命名为 main。重要的是要注意,一个页面只能有一个 <main> 元素。

在开发人员工具中选择 <main> 元素现在将正确标识我们的主内容。
区域地标
我们的主内容可以由不同类型的内容或区域组成,而幸运的是,有一个角色可以实现这一点。region 角色是一个有趣的角色;技术上存在一个具有隐式 region 角色的 HTML 元素,但该元素本身却存在一些争议。
我所说的元素是 <section> 元素,或者有些人称之为另一个名称的 <div>。争议的原因是,当像下面的示例那样使用时,它没有任何语义意义。
<section>
  <h2>Our pizzas</h2>
  <ul>
    <li>Margherita with pineapple</li>
    <li>Veggie with pineapple</li>
    <li>Meaty with pineapple</li>
  </ul>
</section>
使用开发人员工具对其进行检查也将表明它未被标识为区域导航地标。
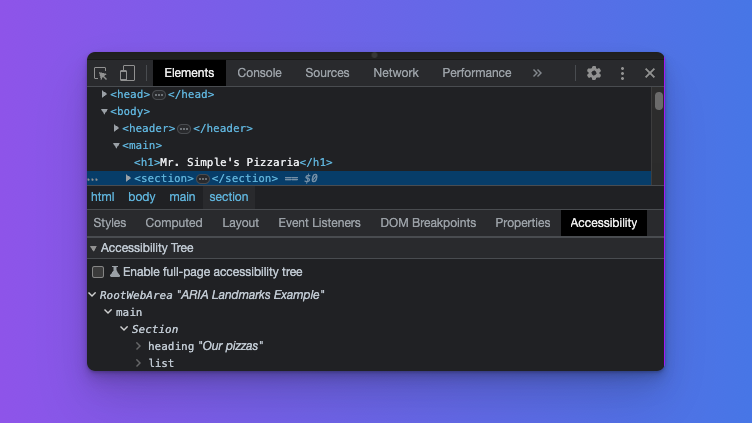
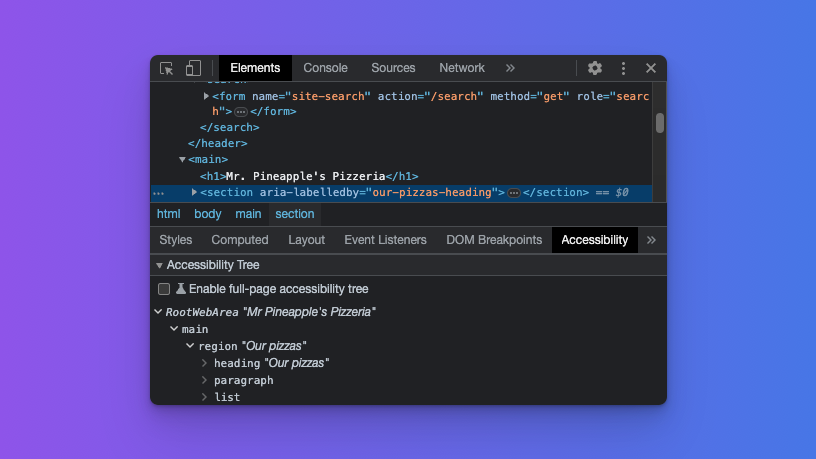
那么,我们如何将其转换为区域呢?我们可以通过使用 aria-labelledby 属性将标题元素与 section 关联起来。这有两个目的:它将 section 转换为区域导航地标,然后标题为该区域提供唯一的名称。
在极少数情况下,当没有要与 <section> 元素关联的标题时,您也可以使用 aria-label 属性来实现相同的结果。让我们更新之前的代码来实现这一点:
<section aria-labelledby="our-pizzas-heading">
  <h2 id="our-pizzas-heading">Our pizzas</h2>
  <p>
    All our pizzas come with the best pizza topping in the world. Pineapple!
  </p>
  <ul>
    <li>Margherita with pineapple</li>
    <li>Veggie with pineapple</li>
    <li>Meaty with pineapple</li>
  </ul>
</section>
当您现在检查 <section> 元素时,它将被正确标识为区域地标,并显示从标题元素继承的名称。
此时,重申使用地标的原因很重要。地标旨在标识用户最可能感兴趣并希望导航到的页面的关键区域。因此,在决定突出显示页面的哪些区域作为地标时要谨慎。
补充地标
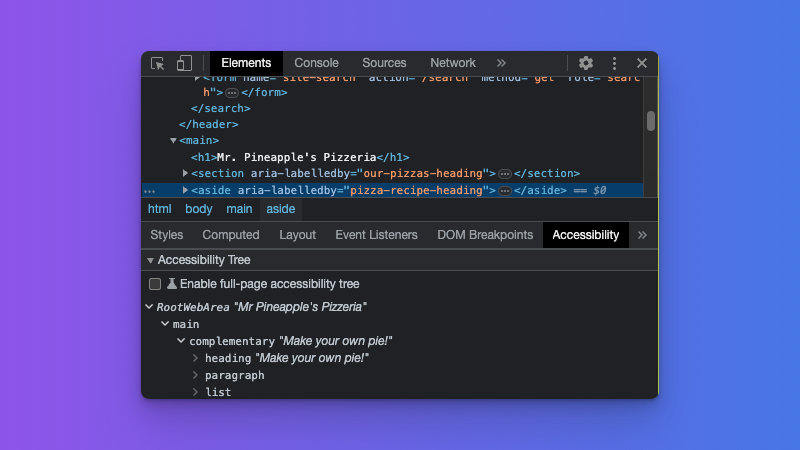
complementary 地标旨在标识与主内容互补的内容,同时在与主内容分离时仍然有意义。这可以包括相关文章、放映时间或天气信息。对于我们的页面,我们将链接到一些很棒的比萨食谱。
这次,我们确实有一个可以用于补充地标的原生 HTML 元素。
<aside aria-labelledby="pizza-recipe-heading">
  <h3 id="pizza-recipe-heading">Make your own pie!</h3>
  <p>Below is a list of our favorite pizza recipes.</p>
  <ul>
    <li><a href="/mushroom-pizza">The shroom</a></li>
    <li><a href="/smokey-joe">Smokey Joe</a></li>
    <li><a href="/fromage">Fromage</a></li>
  </ul>
</aside>
<aside> 元素具有补充的隐式角色,因此是满足我们需求的理想选择。由于一个页面可以有多个补充区域,因此为每个区域命名并确保其唯一且描述性很重要。我们可以通过将标题元素与 aria-labelledby 属性关联,或在 <aside> 元素上使用 aria-label 来实现这一点。
在开发人员工具中检查该元素将显示它被标识为补充导航地标角色,并从关联的标题元素继承其名称。
表单地标
乍一看,这似乎显而易见,如果不是因为一个重要的细微差别,这与我们之前讨论的 <section> 元素的情况类似。让我们为我们的页面添加一个新闻通讯订阅表单。
<div class="newsletter">
  <h3>Subscribe to Mr. Pineapple's newsletter</h3>
  <p>
    In our newsletter, you can expect even more wonderful pizza recipes, all
    featuring the versatile pineapple.
  </p>
  <form name="newsletter" action="/subscribe" type="post">
    <label for="email">Please provide your email address</label>
    <input type="email" id="email" name="email" />

    <button type="submit">Pineapple Me 🍍</button>
  </form>
</div>
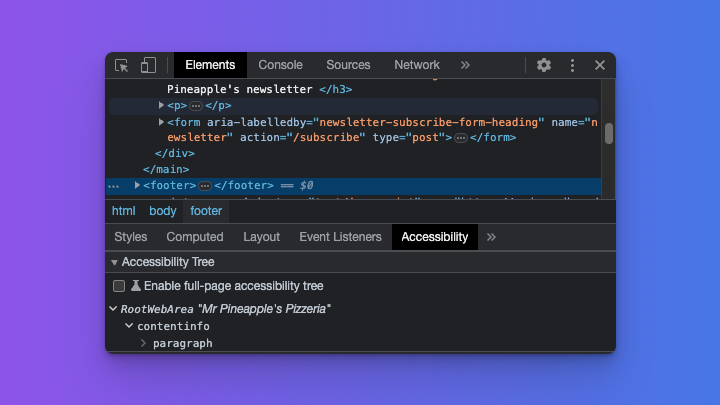
如果您检查 <form> 元素,您可能会失望地发现它未被标识为表单地标,而是被标识为通用区域。
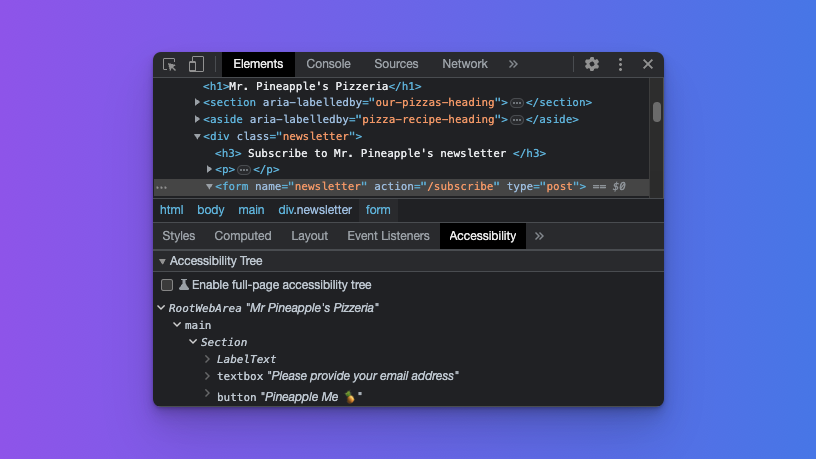
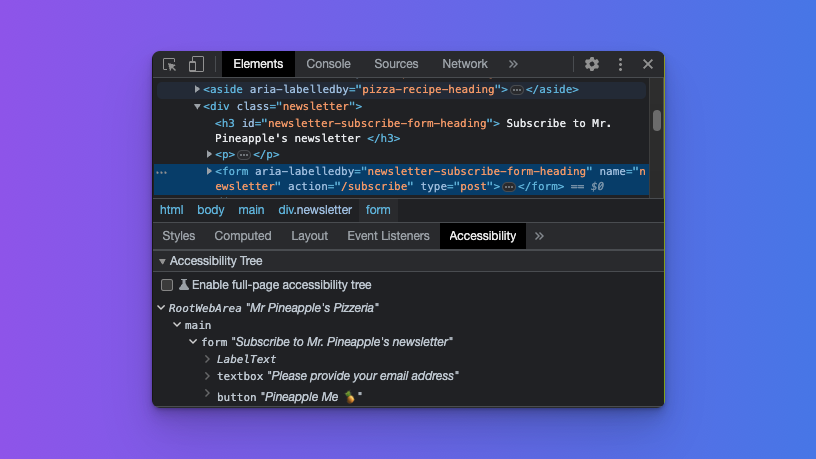
这是怎么回事?与之前的 <section> 元素一样,您需要将标题元素与表单关联,或使用 aria-label 属性。我们已经有一个描述性的标题,所以我们只需要将标题与表单关联起来。
<div class="newsletter">
  <h3 id="newsletter-subscribe-form-heading">
    Subscribe to Mr. Pineapple's newsletter
  </h3>
  <p>
    In our newsletter, you can expect even more wonderful pizza recipes, all
    featuring the versatile pineapple.
  </p>
  <form
    aria-labelledby="newsletter-subscribe-form-heading"
    name="newsletter"
    action="/subscribe"
    type="post">
    <label for="email">Please provide your email address</label>
    <input type="email" id="email" name="email" />

    <button type="submit">Pineapple Me 🍍</button>
  </form>
</div>
完成这些更改后,检查表单元素将得出预期的结果。
内容信息地标
contentinfo 地标用于标识有关网页的信息,例如版权信息或隐私声明链接。最常见的用途是页面页脚。在这里又一次,我们有一个原生 HTML 元素可以提供帮助。
<footer>
<p>Copyright © Mr. Pineapple's Pizzeria - 2023</p>
</footer>
与 <header> 元素一样,重要的是 <footer> 元素不位于 <main> 元素或另一个分节元素内部。如果这样做,它将不会具有 contentinfo 的隐式角色。考虑到我们的 <footer> 元素是 <body> 元素的直接子元素,在开发人员工具中检查它将得出预期的结果。
一个新的搜索 HTML 元素
现在我们已经涵盖了所有地标角色,并且对于每个地标,我们都有一个可以使用的原生 HTML 元素。是的,我们为 region 和 form 地标做了一些额外的工作,但我们从未显式使用 role 属性。
但等等,搜索地标呢?我们不得不在表单上使用 role 属性。该死,你抓到我了!但我在文章后面提到了会给你一个惊喜。需要显式为表单分配 search 角色的日子正在随着新的 <search> 元素的引入而结束。那么,我们如何使用它呢?让我们更新我们之前的搜索地标以使用新元素:
<search>
  <form name="site-search" action="/search" method="get" role="search">
    <label for="query">Find your perfect pizza</label>
    <input type="search" id="query" name="query" />
  </form>
</search>
然而,这就像走在最前沿一样,所以如果您今天(2023 年初)检查 <search> 元素,您会发现它在可访问性树中显示为“ignored”。
这就是为什么我保留了嵌套 <form> 元素上的 role 属性。一旦浏览器和屏幕阅读器开始实现 <search> 元素,表单上的 role 属性将不再需要。曾经,<main> 元素也面临着同样的问题,主要是由于 Internet Explorer 支持不足,因此需要显式地为元素添加 role="main"。
现在我们可以退一步,看看我们一起构建的光荣的可访问性树。
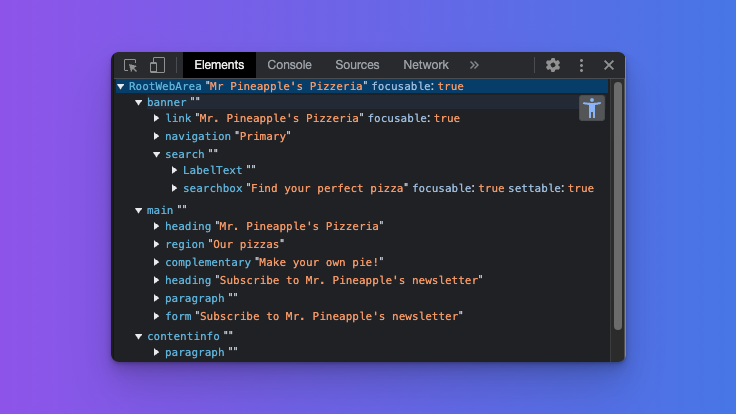
它很美,不是吗?
在 Chrome 中启用完整可访问性树
请注意,显示此树是 Chromium 浏览器中的一项实验性功能。选中开发人员工具中的可访问性选项卡后,您应该会看到一个条目,写着“Enable fullpage accessibility tree”,左侧有一个未选中的复选框。
选中该复选框后,将显示一个通知,要求您重新加载 DevTools。单击按钮并重新加载 DevTools 后,您将在 Elements 面板的右上角看到一个新图标。单击此图标将显示完整的可访问性树。
使用屏幕阅读器演示地标
总而言之,让我们看看我们的地标如何与屏幕阅读器配合使用。
- 观看来自 Mozilla Developer 的视频,其中展示了屏幕阅读器用户如何使用我们的地标进行导航。
- 查看此帖子的 CodeSandbox,以在最终形式中尝试我们上面创建的页面。
总结
HTML 地标是使网页对屏幕阅读器用户更具可访问性的重要工具。通过在网页上定义地标,您可以帮助用户更轻松地导航并快速找到他们所需的信息。请记住,在可能的情况下使用适当的 HTML 元素,并清楚地标记您的地标,以便用户知道它们的作用。