
从 GitHub 无缝迁移到 GitLab:分步指南
如果您之前使用过众多 CI/CD 工具之一,现在正在考虑切换到 GitLab,您可能会对迁移过程的难度感到好奇。在评估新解决方案时,迁移通常是 DevSecOps 团队关心的问题。这是因为从一个系统迁移到另一个系统可能涉及大量工作、复杂性以及陡峭的学习曲线。我们在这里告诉您,迁移到 GitLab 的 AI 驱动的 DevSecOps 平台非常简单。
在本文中,我们将一步一步地指导您完成整个过程。我们将通过我们 项目导入 功能,讲解如何从 GitHub 迁移到 GitLab。我们还将解释如何手动将 GitHub Actions 迁移到 GitLab 管道。
可以从 GitHub 迁移哪些数据到 GitLab?
GitLab 内置的导入器允许自动将 GitHub 项目迁移到 GitLab。您可以直接从 GitLab 的项目创建 UI 访问此内置导入器。在 UI 中,您可以选择要迁移到 GitLab 的数据。可以迁移以下数据:
- 存储库描述
- Git 存储库数据
- 分支保护规则
- 协作者(成员)
- 问题
- 拉取请求
- Wiki 页面
- 里程碑
- 标签
- 发布说明内容
- 发布说明附件
- 评论附件
- 问题描述附件
- 拉取请求描述附件
- 拉取请求评审评论
- 常规问题和拉取请求评论
- Git 大型文件存储 (LFS) 对象
- 拉取请求评审
- 拉取请求指派的评审者
- 拉取请求“合并者”信息
- 讨论中的拉取请求评论回复
- 拉取请求评审评论建议
- 问题和拉取请求事件
GitHub 和 GitLab 对同一概念使用不同的术语,因此在迁移过程中必须进行映射。例如,在迁移协作者或成员时,GitHub 的权限将映射到相应的 GitLab 角色,如下所示:
| GitHub 角色 | GitLab 角色 |
|---|---|
| Read | Guest |
| Triage | Reporter |
| Write | Developer |
| Maintain | Maintainer |
| Admin | Owner |
以下是 GitLab 中对 GitHub 中某些术语的引用:
| GitHub 术语 | GitLab 术语 |
|---|---|
| Pull request | Merge request |
| 动作 | Pipeline |
将数据迁移到 GitLab 的先决条件
现在您知道了可以导入什么,让我们回顾一下执行迁移的先决条件。使用 GitLab 导入器,如果您满足以下要求,可以从“GitHub.com”或“GitHub Enterprise”将项目导入到“GitLab.com”或“自管 GitLab”:
- 您必须是您正在从中导入 GitHub 项目的 GitLab 目标组的维护者 (Maintainer)。
- 存储库中的每个 GitHub 作者和指派者都必须在 GitHub 上拥有公开显示的电子邮件地址,该地址应与其 GitLab 电子邮件地址匹配。
- GitHub 帐户必须具有公开显示的电子邮件地址。
- 必须在 GitLab 上启用 GitHub 导入源(仅在自管 GitLab 中)。
迁移用户时,GitLab 使用 GitHub 中的公开显示电子邮件地址来验证具有相同电子邮件地址的 GitLab 用户。由于电子邮件所有权是唯一的,GitLab 验证有助于确认您已设置了具有有效权限的有效用户。
将数据从 GitHub 导入 GitLab
让我们一步一步地讲解如何执行迁移。
我将迁移我的项目,即 Reddit sentiment analyzer,从 GitHub 到 GitLab。Reddit sentiment analyzer 包含一个拉取请求(在 GitLab 中称为合并请求)、问题和评论。
注意: 虽然您可能无权访问我的项目,但此分步过程适用于您拥有的任何项目。我使用我的项目是为了让您在下一节中看到我如何迁移 GitHub Actions。
-
使用 项目创建界面 在 GitLab 中创建一个项目。
-
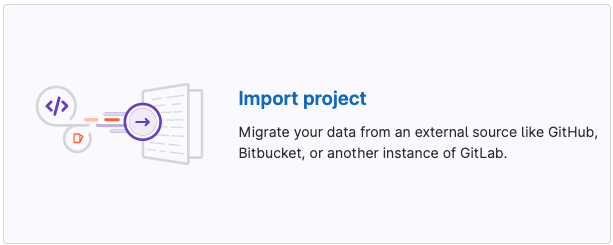
选择“导入项目”框。这使您可以从外部源迁移数据。
-
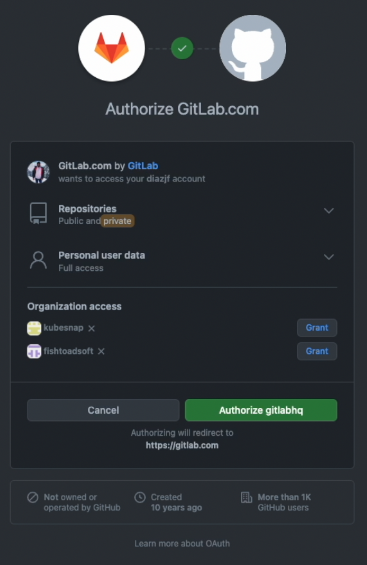
在“从...导入项目”下,点击“GitHub”按钮。这将带您进入“使用 GitHub 进行身份验证”页面。
-
点击“使用 GitHub 进行身份验证”按钮。如果您愿意,也可以指定一个具有“repo 范围”的 GitHub 个人访问令牌。这将带您进入 GitHub 授权应用。在“授权 GitLab.com”页面上,您可以授予对托管您要迁移的项目 GitHub 组织的访问权限。
-
点击项目所在的组织的“授予”按钮。
-
点击“授权 gitlabhq”按钮以授予 GitLab 对所选组织的访问权限。然后您将被带到导入选择页面。
-
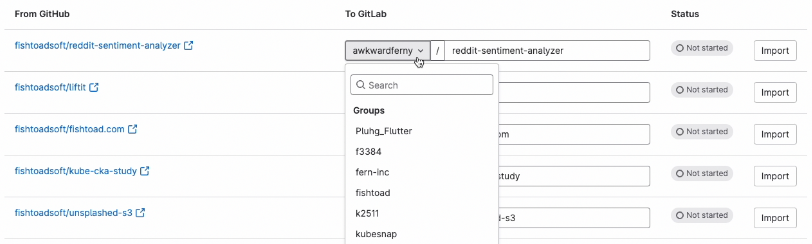
在这里,您可以选择要导入的项目。

注意: 您选择迁移的项目越多,导入所需的时间就越长。
-
接下来,设置您希望将 GitHub 项目迁移到的 GitLab 位置。
-
点击“导入”按钮,导入过程将开始。您可以在 UI 中看到进度。导入完成后,状态将更改为“完成”。
现在您的工作区应该已经有了导入的项目。例如,我的项目位于 https://gitlab.com/awkwardferny/reddit-sentiment-analyzer。
检查导入的项目时,您会在 GitLab 上看到以下内容:
-
存储库迁移完成后

-
问题迁移完成后

-
合并请求迁移完成后

将 GitHub Actions 迁移到 GitLab CI/CD
从 GitHub 迁移项目后,您会注意到没有 GitHub Actions 在运行。不用担心;手动迁移它们是一个简单的过程。让我们开始迁移 GitHub Actions 的过程。
-
检查
.github/workflows文件夹中的 GitHub Actions。在您刚刚导入的 项目中,您应该会看到三个 Action 文件:lint.yml、smoke.yml和unit.yml。让我们详细了解这些文件。-
lint.yml:此文件包含使用 flake8 对源代码执行 linting 的 Action。此 Action 使用python:3.10Docker 映像,并在执行 lint 之前安装应用程序要求。yamlname: "Lint" on: push: branches: [master] pull_request: branches: [master] jobs: lint: runs-on: ubuntu-latest steps: - uses: actions/checkout@v3 - name: Set up Python 3.10 uses: actions/setup-python@v4 with: python-version: "3.10" - name: Install dependencies run: | python -m pip install --upgrade pip pip install flake8 pytest if [ -f requirements.txt ]; then pip install -r requirements.txt; fi - name: Lint with flake8 run: | # stop the build if there are Python syntax errors or undefined names flake8 . --count --select=E9,F63,F7,F82 --show-source --statistics # exit-zero treats all errors as warnings. The GitHub editor is 127 chars wide flake8 . --count --exit-zero --max-complexity=10 --max-line-length=127 --statistics -
smoke.yml:此文件包含通过运行 CLI 帮助菜单执行 smoke test 的 Action。它使用python:3.10Docker 映像,并在执行 smoke test 之前安装应用程序要求。yamlname: "Smoke Tests" on: push: branches: [master] pull_request: branches: [master] jobs: smoke-tests: runs-on: ubuntu-latest steps: - uses: actions/checkout@v3 - name: Set up Python 3.10 uses: actions/setup-python@v4 with: python-version: "3.10" - name: Install dependencies run: | python -m pip install --upgrade pip pip install setuptools if [ -f requirements.txt ]; then pip install -r requirements.txt; fi - name: Install Sentiment Analysis Application run: | python setup.py install - name: Run smoke tests run: | reddit-sentiment --help -
unit.yml:此文件包含使用 pytest 执行单元测试的 Action。它使用python:3.10Docker 映像,并在运行单元测试之前安装应用程序要求。yamlname: "Unit Tests" on: push: branches: [master] pull_request: branches: [master] jobs: unit-tests: runs-on: ubuntu-latest steps: - uses: actions/checkout@v3 - name: Set up Python 3.10 uses: actions/setup-python@v4 with: python-version: "3.10" - name: Install dependencies run: | python -m pip install --upgrade pip pip install pytest if [ -f requirements.txt ]; then pip install -r requirements.txt; fi - name: Test with pytest run: | python -m pip install --upgrade pip if [ -f test-requirements.txt ]; then pip install -r test-requirements.txt; fi pytest tests/让我们将这些 Actions 迁移到 GitLab。
-
-
转到 GitLab 上最近导入的项目,并打开 Web IDE。
-
在根目录创建一个名为
.gitlab-ci.yml的文件。此文件定义了 GitLab 管道。 -
添加以下配置,它将 GitHub Actions 作为作业添加到 GitLab 管道中。请注意描述每个部分的注释。
yaml# This creates the stages in which the jobs will run. By default, all # jobs will run in parallel in the stage. Once the jobs are completed # successfully, you move on to the next stage. The way jobs run # is completely configurable. stages: - test # With the include statement, you can quickly add jobs that have # been pre-defined in external YAML files. The SAST job I've included below # is provided and maintained by GitLab and adds Static Application # Security Testing (SAST) to your pipeline. include: - template: Jobs/SAST.gitlab-ci.yml # This is the unit test job that does exactly what is defined in # the GitHub Action in unit.yml. You can see it uses the python:3.10 # Docker image, installs the application dependencies, and then runs # the unit tests with pytest. It was added with a simple copy and # paste and minor syntax changes. unit: image: python:3.10 stage: test before_script: - python -m pip install --upgrade pip - pip install pytest - if [ -f requirements.txt ]; then pip install -r requirements.txt; fi script: - pytest tests/ # This is the lint job that does exactly what is defined in the # GitHub Action in lint.yml. You can see it uses the python:3.10 # Docker image, installs the application dependencies, and then # performs the linting with flake8. It was added with a simple copy # and paste and minor syntax changes. lint: image: python:3.10 stage: test before_script: - python -m pip install --upgrade pip - pip install flake8 - if [ -f requirements.txt ]; then pip install -r requirements.txt; fi script: - flake8 . --count --select=E9,F63,F7,F82 --show-source --statistics - flake8 . --count --exit-zero --max-complexity=10 --max-line-length=127 --statistics # This is the smoke test job that does exactly what is defined in # the GitHub Action in smoke.yml. You can see it uses the python:3.10 # Docker image, installs the application dependencies, and then runs # the smoke tests with the Reddit sentiment analysis CLI. It was # added with a simple copy and paste and minor syntax changes. smoke: image: python:3.10 stage: test before_script: - python -m pip install --upgrade pip - pip install setuptools - if [ -f requirements.txt ]; then pip install -r requirements.txt; fi - python setup.py install script: - reddit-sentiment --help您可以看到在 GitLab 中执行的脚本与 GitHub Actions 中的脚本相匹配。主要区别在于设置作业和阶段的语法。要了解更多关于如何创建和配置管道的信息,请查看 GitLab CI/CD 文档。
-
让我们来提交代码。在 Web IDE 中,点击“源代码控制”选项卡,这是侧边栏中从顶部数的第三个图标。然后点击“提交”按钮,选择“继续”,然后就大功告成了,您现在应该会有一个正在运行的管道。
-
检查管道并确保作业正在正常运行。返回到您的项目,然后点击管道图标。您可以看到我们创建的四个作业已运行。

-
点击“unit”作业,您将看到单元测试已成功运行。
 $ pytest tests/
 ============================= test session starts ==============================
 platform linux -- Python 3.10.11, pytest-7.3.1, pluggy-1.0.0
 rootdir: /builds/awkwardferny/reddit-sentiment-analyzer
 collected 2 items
 tests/test_scraper.py ..                                                 [100%]
 ============================== 2 passed in 0.09s ===============================
 Cleaning up project directory and file based variables
 00:00
 Job succeeded
总结
将项目从 GitHub 迁移到 GitLab 最初可能看起来很困难。然而,正如本指南所示,这个过程远非复杂。通过适当的规划和遵循上述步骤,迁移到 GitLab 平台可以顺利而简单。
这是 GitLab 的赞助文章。GitLab 是一个全面的基于 Web 的 DevSecOps 平台,提供 Git 存储库管理、问题跟踪、持续集成和部署管道功能。它有开源和专有版本,旨在覆盖整个 DevOps 生命周期,使其成为寻求单一平台来管理代码和操作数据的团队的热门选择。