
使用 TestGrid 实现传统测试自动化的现代化
团队使用各种工具和脚本自动化软件测试已成为一项标准实践。然而,传统的测试自动化方法并未像应用程序开发实践那样同步发展。这种差距凸显了现代化测试自动化方法的必要性,以跟上更快的软件开发周期。
TestGrid 的统一测试平台旨在通过提供易于访问的端到端测试自动化以及对 Selenium 和 Appium 等流行工具的无缝支持来简化测试流程。
在本文中,我们将涵盖 Web 和移动应用程序的自动化测试的传统方法和更新方法。我们将从查看常用的测试自动化方法开始,了解它们的不足之处,并讨论提高效率的方法。然后,我们将深入探讨更现代的方法。
使用传统的测试自动化方法
测试自动化侧重于编写用户旅程和应用程序功能的脚本,以验证应用程序是否按预期工作。测试自动化的传统方法主要依赖于编写测试脚本。
这种方法的一个主要缺点是,随着应用程序功能的增长,这些脚本会变得难以维护,从而导致高昂的维护成本。脚本也可能变得不稳定,导致间歇性失败。
让我们看看两种广泛采用的测试自动化方法:使用 Selenium 和 Appium。
使用 Selenium 自动化 Web 应用程序测试
Selenium 是开发人员和测试人员用来为 Web 应用程序编写自动化 UI 测试的流行测试自动化工具。这些测试可以在不同的 Web 浏览器中执行,并且可以使用 Selenium 支持的众多语言之一来编写。
让我们看一个使用 Selenium 编写自动化测试的例子。我们将使用一个 演示测试网站 来执行以下步骤:
- 启动您选择的浏览器。
- 导航到 demoqa.com 的登录页面。
- 输入用户名和密码。
- 点击登录按钮。
- 验证用户已登录,并且用户名显示在屏幕上。
注意:您可以使用新用户按钮创建用户,以便为测试自动化场景提供有效的凭据。
确保您具备开始使用 Selenium 所需的先决条件。您可以按照 使用 Java 设置 Selenium 的分步指南 在您的系统上进行操作。
这是我们将用于自动化上述步骤执行的 Selenium 代码。
public class Login {
  @Test
  public void loginTest() throws InterruptedException {

    WebDriver driver = new ChromeDriver(); // Instantiating the webdriver instance
    driver.get("https://demoqa.com/login"); // Launching the website
    driver.manage().window().maximize(); // Maximizing browser window

    String user = "your user name";
    String pass = "your password";

    // Locating web elements for username, password, and the Login button
    driver.findElement(By.id("userName")).sendKeys(user);
    driver.findElement(By.id("password")).sendKeys(pass);
    driver.findElement(By.id("login")).click();

    // Using sleep to load web elements on page
    Thread.sleep(5000);

    // Capturing the displayed username after login
    String uName = driver.findElement(By.id("userName-value")).getText();

    // Asserting that the logged-in username matches the expected username
    Assert.assertEquals(uName, user);

    // Locating the web element for the Logout button and closing the webdriver instance
    driver.findElement(By.id("submit")).click();
    driver.quit();
  }
}
如注释中所述,在此代码中,我们正在启动我们的网站,定位 Web 元素,然后在它们上执行所需的操作。执行此代码后,您应该会看到成功的执行日志。
上述自动化测试验证了一个关键的用户登录功能。然而,构建和维护此类测试可能非常耗时。应用程序的任何微小更改都可能需要更新整个测试套件中的代码,从而增加开销。此外,在传统的测试自动化方法下,测试环境的组合可能受到限制。
将 Selenium 与 TestGrid 结合使用以自动化 Web 应用程序测试
让我们使用 TestGrid 的真实设备云 在我们选择的云浏览器和平台上运行上一节中显示的 Selenium 代码。TestGrid 允许重用您现有的 Selenium 测试脚本并扩展您的自动化测试执行。
登录 TestGrid 并按照 在 Web 浏览器上执行本地 Selenium 代码的分步指南。
下图显示了 TestGrid 的真实设备云仪表板。在我们的示例中,我们选择了 Linux 平台上的 Firefox 浏览器。

按照上面链接指南中的步骤并设置所需的配置后,我们得到以下代码:
public class TestGridDemoQaLogin {

  @Test
  public void loginTest() throws InterruptedException, MalformedURLException {

    // Setting the desired capabilities to use the TestGrid platform
    DesiredCapabilities dc = new DesiredCapabilities();
    dc.setCapability("browserName", "firefox");
    dc.setCapability("platformName", "linux");
    dc.setCapability("tg:userToken", "Your Token");
    dc.setCapability("tg:udid", "201");

    // Instantiating the remote webdriver instance and passing desired capabilities to it
    WebDriver driver = new RemoteWebDriver(new URL("Your Browser Run URL(Public)"),dc);

    // Remaining steps are the same as in the previous Selenium code
    driver.get("https://demoqa.com/login");
    driver.manage().window().maximize();

    String user = "your user name";
    String pass = "your password";

    driver.findElement(By.id("userName")).sendKeys(user);
    driver.findElement(By.id("password")).sendKeys(pass);
    driver.findElement(By.id("login")).click();

    Thread.sleep(5000);

    String uName = driver.findElement(By.id("userName-value")).getText();

    Assert.assertEquals(uName, user);

    driver.findElement(By.id("submit")).click();
    driver.quit();
  }
}
当您在本地系统上执行此代码时,您会注意到它在 TestGrid 的真实设备云上执行。您可以从门户网站查看远程执行。您还可以通过简单地选择执行测试的设备,在自动化会话选项卡上查看执行状态、录制和运行摘要。
使用 Appium 自动化移动应用程序测试
Appium 是一个流行的开源自动化框架,用于测试原生、混合和移动 Web 应用程序。编写 Appium 脚本需要了解移动操作系统以及 Java、C++ 和 Python 等编程语言。对于移动应用程序的自动化测试,由于技术栈的快速发展以及设备和操作系统的更新,维护测试脚本可能具有挑战性。
对于这里的演示,我们使用的是基本的计算器应用程序。我们将使用 Appium 自动化以下用例测试:
- 启动计算器应用程序。
- 执行两个数字的乘法。
- 记录数学运算的结果。
- 断言结果。
我们在这里将 Appium 与 Java 结合使用。测试在虚拟设备(模拟器)上运行。您可以使用真实设备或虚拟设备进行测试执行。遵循此 Appium 教程 进行设置和其他先决条件。
这是我们使用的 Appium 代码,它将在本地系统上执行以执行上述步骤。
package appium;

import java.net.MalformedURLException;
import java.net.URL;
import org.openqa.selenium.remote.DesiredCapabilities;
import org.testng.Assert;
import org.testng.annotations.Test;
import io.appium.java_client.AppiumBy;
import io.appium.java_client.android.AndroidDriver;

public class Calculator {

  @Test
  public void calculator() throws MalformedURLException {

    DesiredCapabilities dc = new DesiredCapabilities();

    // Setting the desired capabilities for the android device
    dc.setCapability("platformName", "android");
    dc.setCapability("platformVersion","14");
    dc.setCapability("deviceName", "Pixel6_TestGrid");
    dc.setCapability("automationName", "UiAutomator2");

    // Setting capability for the application we want to test
    dc.setCapability("app", "/Users/macair/Downloads/calculator.apk");

    // Instantiating Android Driver and using Appium server host and port
    AndroidDriver driver = new AndroidDriver(new URL("http://127.0.0.1:4723/wd/hub"), dc);

    // Locating numbers, mathematical operators, and the equals button in the Calculator app
    driver.findElement(AppiumBy.id("com.google.android.calculator:id/digit_4")).click();
    driver.findElement(AppiumBy.id("com.google.android.calculator:id/op_mul")).click();
    driver.findElement(AppiumBy.id("com.google.android.calculator:id/digit_9")).click();
    driver.findElement(AppiumBy.id("com.google.android.calculator:id/eq")).click();

    // Storing the result in a string variable
    String result = driver.findElement(
      AppiumBy.id("com.google.android.calculator:id/result_final")
    ).getText();
    System.out.println("The result is - "+result);

    Assert.assertEquals(result, "36");
    driver.quit();
  }
}
我们的测试代码运行良好。但是,它需要具备相关技能和知识的专业人员才能实施。此外,执行这些测试的设备可用性有限,这可能会使实现最佳测试覆盖率变得困难。
将 Appium 与 TestGrid 结合使用以自动化移动应用程序测试
让我们看看如何在真实设备云上执行 Appium 测试脚本。使用我们本地 Appium 移动测试的方法与我们上面看到的 Web 应用程序的方法非常相似。您可以遵循此 在设备云上执行本地 Appium 代码的分步指南。
让我们看看更新后的代码,其中包含与我们选择的 TestGrid 设备相匹配的 DesiredCapabilities。例如,我们指定了 udid、systemPort 和 userToken。
package appium;

import java.net.MalformedURLException;
import java.net.URL;
import org.openqa.selenium.remote.DesiredCapabilities;
import org.testng.Assert;
import org.testng.annotations.Test;
import io.appium.java_client.AppiumBy;
import io.appium.java_client.android.AndroidDriver;

public class CalculatorTestGrid {

  @Test
  public void calculator() throws MalformedURLException {

    DesiredCapabilities dc = new DesiredCapabilities();

    // Setting the desired capabilities for the android device
    dc.setCapability("platformName", "android");
    dc.setCapability("platformVersion","12");
    dc.setCapability("deviceName", "Samsung Galaxy S21");
    dc.setCapability("automationName", "UiAutomator2");
    dc.setCapability("udid", "R5CRC28KGKB");
    dc.setCapability("tg:systemPort", "4005");
    dc.setCapability("tg:userToken", "Your user token");

    // Since the application is installed on the device, we directly use
    // the package name and main activity
    dc.setCapability("appPackage", "com.google.android.calculator");
    dc.setCapability("appActivity", "com.android.calculator2.Calculator");

    AndroidDriver driver = new AndroidDriver(new URL("Your TestGrid Appium URL"), dc);

    // Remaining steps are the same as in the previous Appium code
    driver.findElement(AppiumBy.id("com.google.android.calculator:id/digit_4")).click();
    driver.findElement(AppiumBy.id("com.google.android.calculator:id/op_mul")).click();
    driver.findElement(AppiumBy.id("com.google.android.calculator:id/digit_9")).click();
    driver.findElement(AppiumBy.id("com.google.android.calculator:id/eq")).click();

    String result = driver.findElement(
      AppiumBy.id("com.google.android.calculator:id/result_final")
    ).getText();
    System.out.println("The result is - "+result);

    Assert.assertEquals(result, "36");
    driver.quit();
  }
}
执行此更新代码后,您应该会在 IDE 中看到成功的执行日志。您还可以通过导航到左侧面板中的自动化会话选项卡并选择执行代码的设备来查看执行结果(或正在进行的执行摘要)。
您将能够看到执行的每个步骤的状态以及它们的屏幕截图。此外,您还可以查看这些测试的日志和视觉测试结果(如果已启用)。
利用 TestGrid 的现代化自动化测试解决方案
TestGrid 的无代码测试自动化平台允许编程知识很少或没有编程知识的用户开始自动化测试。通过使用无代码自动化,您可以直观地记录用户旅程。录制会自动生成测试脚本,因此无需进行编码。此功能还有助于大幅减少脚本维护开销。
使用 TestGrid 的测试脚本生成器自动化 Web 应用程序测试
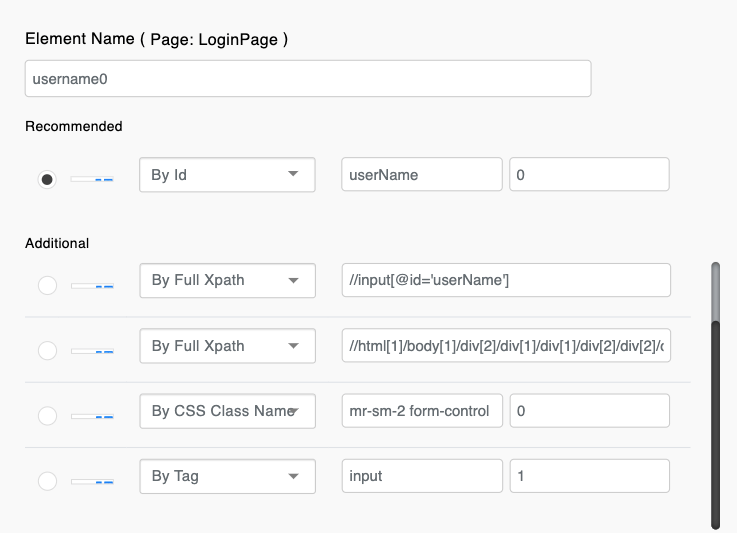
让我们看看如何使用 TestGrid 的 无脚本 Web 测试用例编写器,在没有任何代码的情况下自动化 demoqa 网站的相同“登录”用例。按照添加测试用例时测试用例生成器提示的步骤进行操作。输入 URL,选择浏览器和网页,然后根据需要为页面上的不同元素添加操作。
正如您将在下面的屏幕截图中看到的,当您单击要交互的 Web 元素区域时,将自动检测到该元素的定位器。您还将看到指定了不同的定位器,您可以选择所需的定位器。您还可以选择手动编写定位器,以防系统无法检测到 Web 元素的定位器。
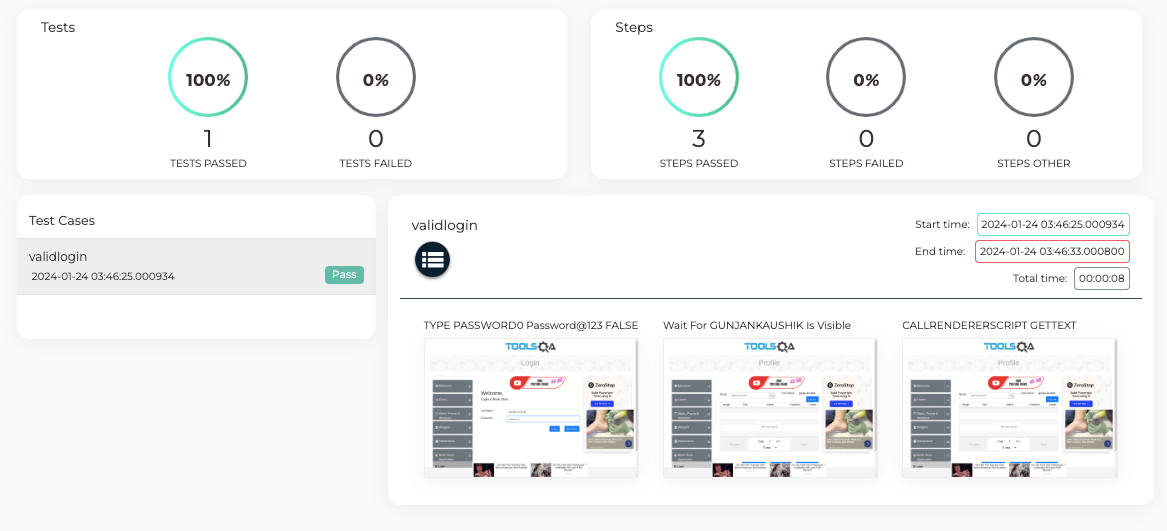
在拥有所需的测试数据后,您可以添加登录操作以及必要的详细信息,以生成测试用例的测试函数。然后,您可以运行您的测试用例。随着执行的进行,您可以开始观察正在生成的日志和测试状态。

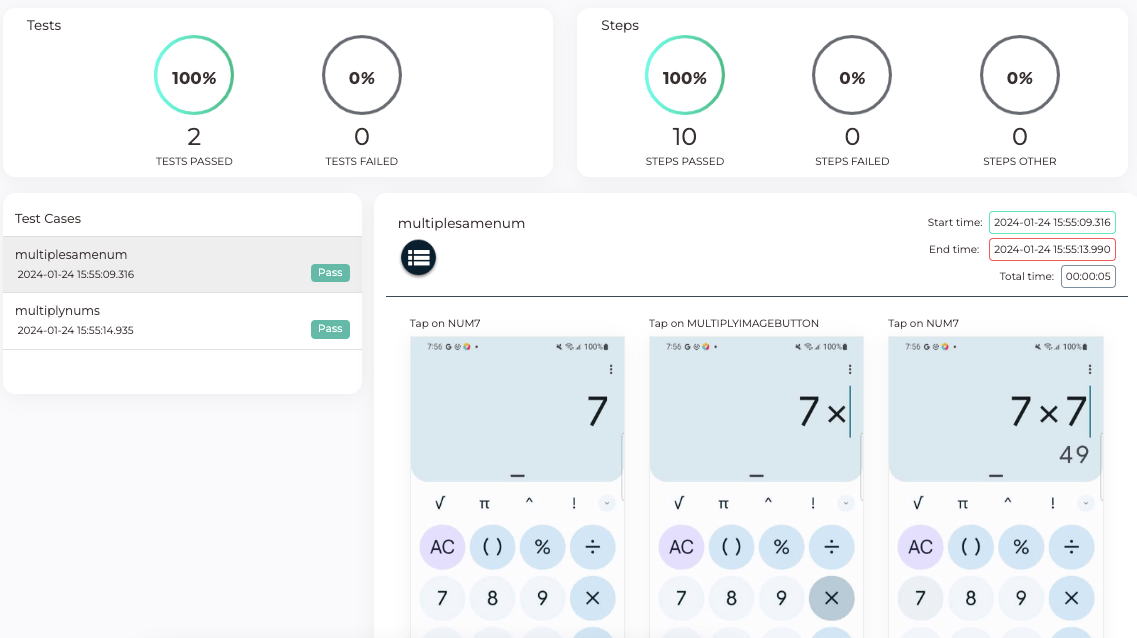
单击左侧面板中的构建摘要,可查看诸如通过和失败的步骤数、执行步骤的屏幕截图(如果已启用)、开始和结束时间以及测试状态等详细信息。
执行完成后,您可以访问左侧面板中事务分析下的各种分析报告。
TestGrid 的无代码测试生成器提供的另一项功能是“录制和播放”。它允许您将应用程序或浏览器操作转换为健壮的自动化测试。在您创建项目和模块后,您可以单击使用无脚本添加测试用例来使用此功能。您会注意到右侧面板中有一个开始录制按钮,单击它将开始录制您的操作。完成后,您可以单击停止。请注意,实时视图和元素选择器在执行期间会被锁定。

停止录制后,您可以编辑操作列中的参数,甚至可以使用元素选择器对通过录制添加的步骤进行更多更改。
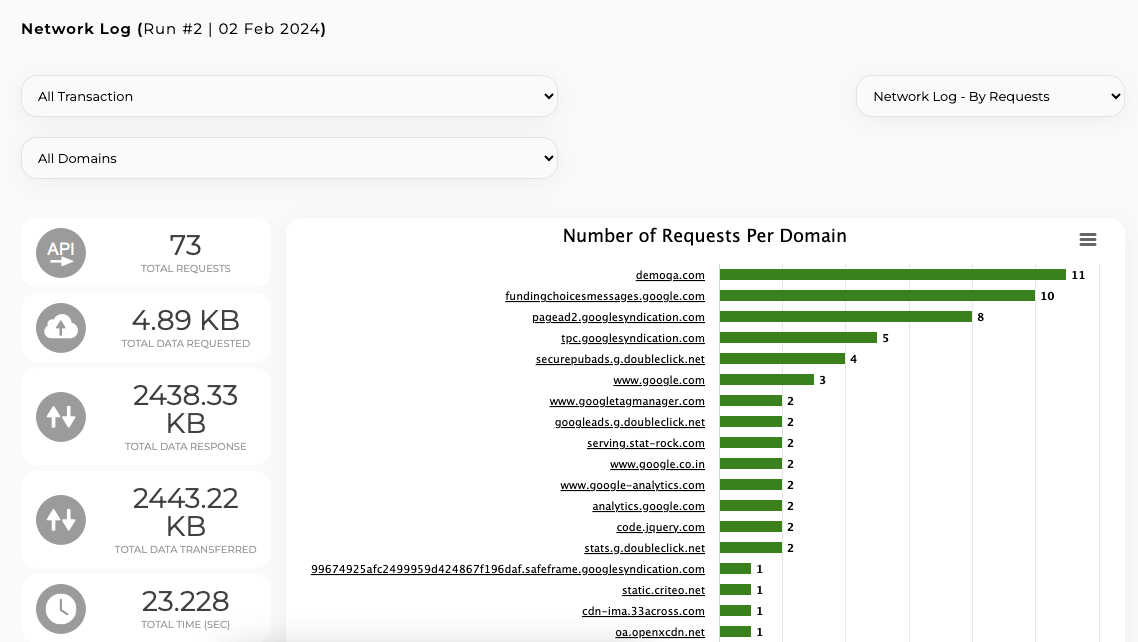
然后,您可以导航回测试用例并像之前一样执行测试。您将能够看到执行情况以及不同分析报告中的结果。使用网络日志,您可以查看发送到域的请求以及每个请求所花费的时间。
本节演示了如何轻松编写无脚本自动化测试用例,并在需要时添加自定义脚本。TestGrid 的测试脚本生成器可以帮助您提高现代 Web 应用程序自动化测试的速度和可靠性。
使用 TestGrid 的测试脚本生成器自动化移动应用程序测试
与 Web 应用程序测试一样,您可以使用 TestGrid 的 无脚本移动应用测试用例编写 来测试移动应用程序。使用此功能,您可以快速开始自动化移动应用程序,而无需手动设置运行自动化测试所需的服务器、客户端、设备和其他配置。
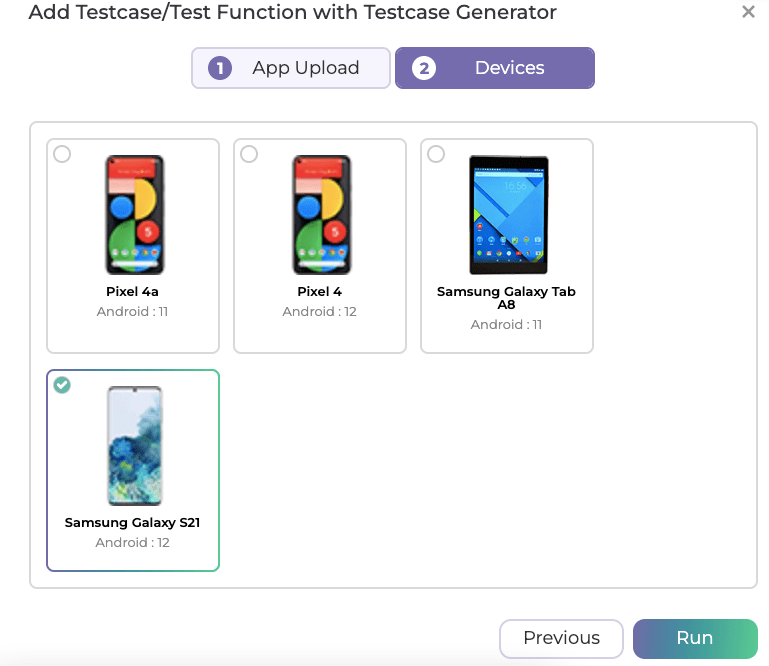
单击使用测试用例生成器添加测试函数按钮后,您会看到一个弹出窗口,要求输入您要测试的应用程序的 apk/ipa/bundle ID。上传应用程序,选择要在其上执行测试的设备,然后单击运行。
接下来的步骤与 Web 应用的测试用例创建相似。
保存了对两个数字应用乘法运算并检查结果的步骤后,将添加测试函数。请注意,您可以直接编写测试用例,而无需编写测试函数,就像我们在下面所做的那样。您可以为跨测试用例重复使用的步骤创建测试函数。这些可以作为公共函数重用。

在您运行测试用例后,选择要在其上执行测试的构建和设备。在合并和编译之后,您可以实时看到执行情况以及生成的日志。
要查看有关执行的任何详细信息,您可以查看构建摘要。
与 Web 应用程序类似,您也可以将“录制和播放”功能用于移动应用程序。
此外,您还可以利用 TestGrid 提供的多种报告和日志,这些报告和日志便于分析执行的性能。Insights 功能显示了与执行相关的各种性能参数的图形表示,例如 CPU 负载、内存使用情况、请求和响应数据大小等。
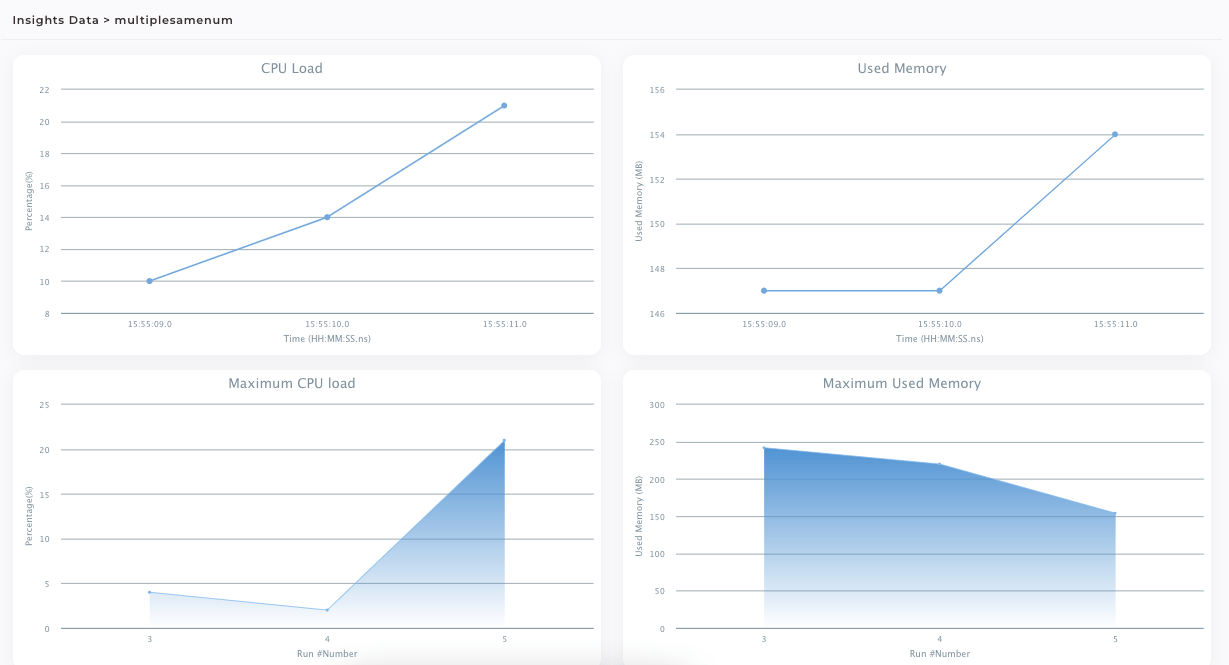
此外,事务分析提供了关于性能基准的各种可下载报告,包括设备信息。
本节演示了如何利用详尽的报告、分析和易于执行的功能来扩展您的自动化范围。借助 TestGrid 的真实设备云,您可以将测试覆盖范围扩展到各种设备。无论您是拥有成熟的测试框架还是从零开始,TestGrid 都能让您从上次中断的地方继续。
使用 TestGrid 的视觉测试功能
视觉测试超越了功能检查,可以检测敏捷开发过程中的视觉回归。
TestGrid 通过智能测试自动化使视觉测试更具可扩展性。它使团队能够在所有平台上自动捕获屏幕截图,并使用基于 AI 的图像比较来查找差异。深入的热图和指标以及分析仪表板有助于测试团队自动化 Web 和移动应用程序的视觉验证。此功能通过确保设计一致性,帮助测试团队实现出色的用户体验。
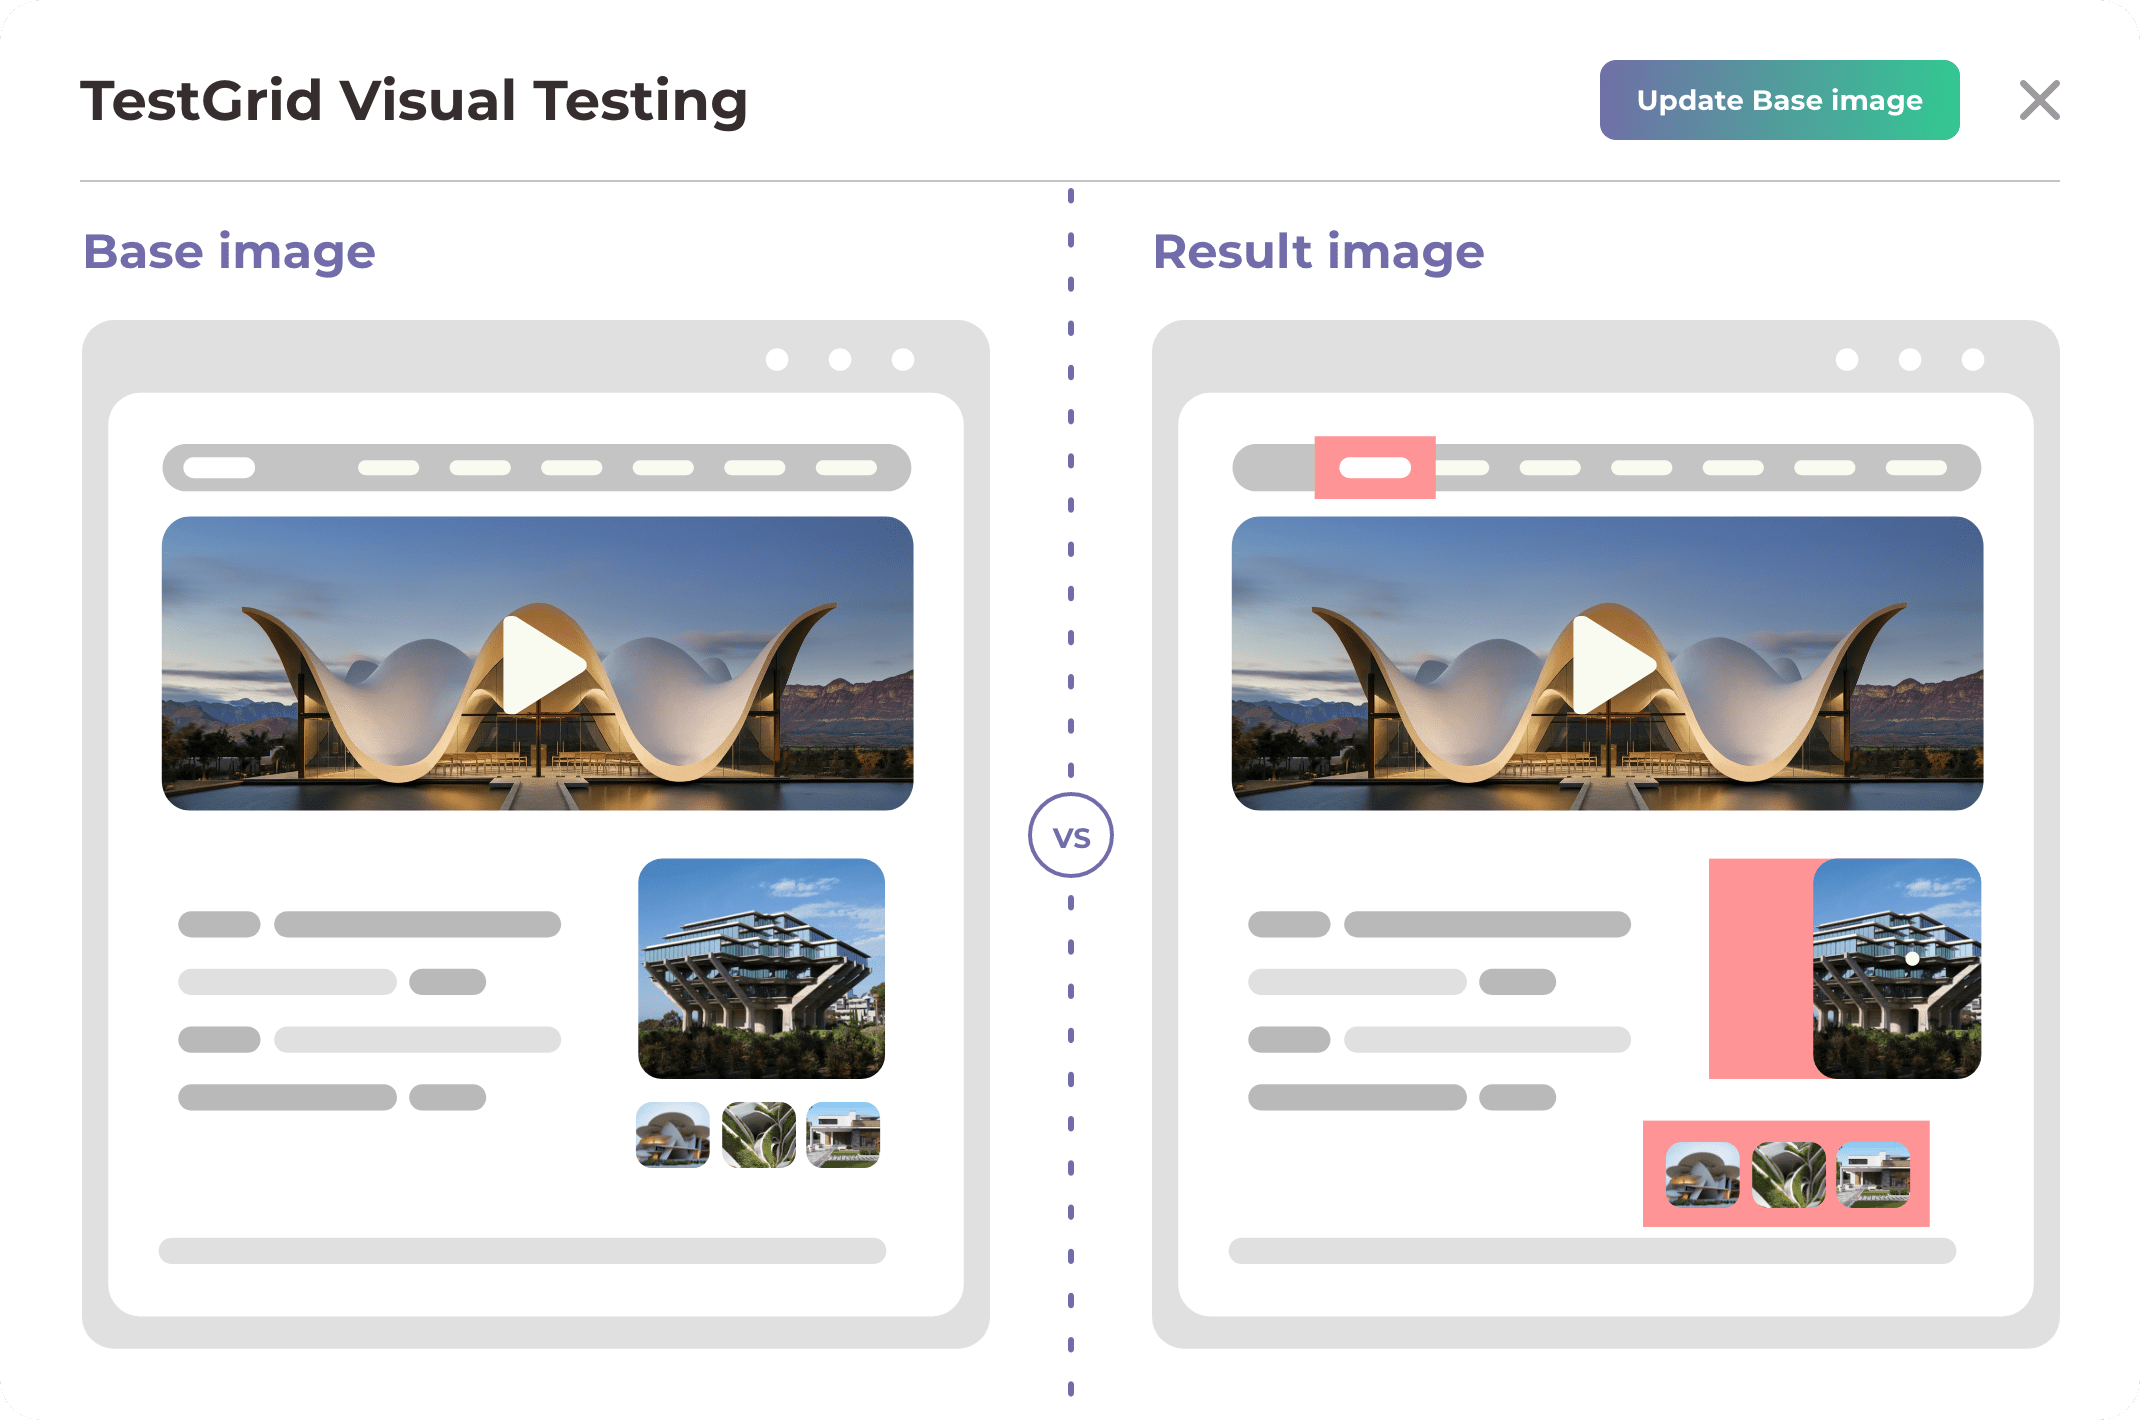
在按照配置视觉测试的步骤在您的 Selenium 或 Appium 代码中进行操作后,您可以在选定设备的自动化会话结果中的视觉测试选项卡中查看视觉测试结果。
视觉测试在确保任何应用程序的整体质量方面发挥着关键作用。彻底测试用户界面,注重细节,可以提高用户满意度和留存率。TestGrid 提供了将视觉测试功能轻松集成到现有测试中的能力,从而提供了一种方法来增加被测系统的总体覆盖范围。
总结
随着软件交付的加速,需要更新测试实践以保持相关性。现代应用程序需要高质量的基准,而这些基准在传统的测试自动化方法中是缺乏的。为 Selenium 或 Appium 编写测试脚本既复杂又耗时。频繁的更改使这些脚本不可靠,并增加了维护开销。
TestGrid 增强了传统功能,以提供面向未来的测试自动化。它提供了无代码自动化、易于集成以及强大的分析和报告等现代功能。使用计算机视觉和 AI 的无脚本测试有助于实现规模和稳定性。测试团队可以轻松高效地实现跨浏览器、设备和平台的测试覆盖,并在产生任何业务影响之前可视化 UI 问题。
此帖子由 TestGrid 赞助。TestGrid 是云端和本地端端到端自动化测试解决方案的领先提供商。TestGrid 专注于简化测试流程,提供尖端功能,使团队能够显着节省成本和时间,同时加速其上市策略。