使用 CSS Painting API
CSS Paint API 旨在让开发者以编程方式定义图像,然后这些图像可以在任何可以调用 CSS 图像的地方使用,例如 CSS 的 background-image、border-image、mask-image 等。
要以编程方式创建 CSS 样式表使用的图像,我们需要经历几个步骤:
- 使用
registerPaint()函数定义一个 paint worklet。 - 注册 worklet。
- 包含
paint()CSS 函数。
为了详细说明这些步骤,我们将从创建一个半高亮背景开始,就像这个标题一样。

注意: 有关完整的演示以及 源代码,请参阅 CSS Painting API 示例。
CSS Paint Worklet
在外部脚本文件中,我们使用 registerPaint() 函数来命名我们的 CSS Paint Worklet。它接受两个参数。第一个是我们给 worklet 起的名字——这个名字将在我们的 CSS 中用作 paint() 函数的参数,当我们想将此样式应用于某个元素时。第二个参数是实现所有魔力的类,它定义了上下文选项以及在将渲染到将成为我们图像的二维画布上。
registerPaint(
  "header-highlight",
  class {
    /*
     * define if alpha transparency is allowed alpha
     * is set to true by default. If set to false, all
     * colors used on the canvas will be fully opaque
     */
    static get contextOptions() {
      return { alpha: true };
    }

    /*
     * ctx is the 2D drawing context
     * a subset of the HTML Canvas API.
     */
    paint(ctx) {
      ctx.fillStyle = "hsl(55 90% 60% / 100%)";
      ctx.fillRect(0, 15, 200, 20); /* order: x, y, w, h */
    }
  },
);
在此类示例中,我们使用 contextOptions() 函数定义了一个上下文选项:我们返回了一个对象,说明允许 alpha 透明度。
然后,我们使用 paint() 函数在画布上进行绘制。
paint() 函数可以接受三个参数。在这里,我们提供了一个参数:渲染上下文(我们稍后会更详细地介绍),通常用变量名 ctx 来引用。2D Rendering Context 是 HTML Canvas API 的一个子集;Houdini 可用的版本(称为 PaintRenderingContext2D)是 Canvas API 的一个更小的子集,它包含了 Canvas API 的大部分功能,但 例外 是 CanvasImageData、CanvasUserInterface、CanvasText 和 CanvasTextDrawingStyles API。
我们将 fillStyle 定义为 hsl(55 90% 60% / 100%),这是一种黄色,然后调用 fillRect() 来创建一个该颜色的矩形。fillRect() 的参数按顺序是 x 轴原点、y 轴原点、宽度和高度。fillRect(0, 15, 200, 20) 创建了一个宽度为 200 个单位、高度为 20 个单位的矩形,该矩形距离内容框左侧 0 个单位,距离顶部 15 个单位。
我们可以使用 CSS 的 background-size 和 background-position 属性来重置此背景图像的大小或位置,但这只是我们在 paint worklet 中创建的黄色框的默认大小和位置。
我们尝试使示例保持简单。有关更多选项,请查看 <canvas> 文档。我们稍后也会在本教程中增加一些复杂性。
注册 Worklet
要使用 paint worklet,我们需要使用 addModule() 注册它,并在 CSS 中包含它,确保 CSS 选择器匹配我们 HTML 中的 DOM 节点。
我们的 paint worklet 的设置和设计是在上面显示的外部脚本中进行的。我们需要从主脚本中注册这个 worklet。
CSS.paintWorklet.addModule("nameOfPaintWorkletFile.js");
这可以通过在主 HTML 的 <script> 或从文档链接的外部 JavaScript 文件中使用 paint worklet 的 addModule() 方法来完成。
使用 Paint Worklet
在我们的示例中,paint worklet 与主脚本文件一起存储。要使用它,我们首先注册它。
CSS.paintWorklet.addModule("header-highlight.js");
在 CSS 中引用 Paint Worklet
一旦我们注册了一个 paint worklet,我们就可以在 CSS 中使用它。像使用任何其他 <image> 类型一样使用 CSS paint() 函数,使用我们在 paint worklet 的 registerPaint() 函数中使用的相同字符串标识符。
.fancy {
  background-image: paint(header-highlight);
}
整合起来
然后,我们可以将 fancy 类添加到页面上的任何元素,以添加一个黄色框作为背景。
<h1 class="fancy">My Cool Header</h1>
在 支持 CSS Paint API 的浏览器中,下面的示例看起来会和上面的图片一样。
虽然你无法操作 worklet 的脚本,但你可以修改 background-size 和 background-position 来改变背景图像的大小和位置。
PaintSize
在上面的示例中,我们创建了一个 20x200 单位的框,距离元素顶部 15 个单位绘制,无论元素大小如何,它都是相同的。如果文本很小,黄色框看起来就像一个巨大的下划线。如果文本很大,这个框看起来可能像第一个三个字母上方的条形。如果背景图像相对于元素的大小是成比例的,那就更好了——我们可以使用元素的 paintSize 属性来确保背景图像与元素盒模型大小成比例。
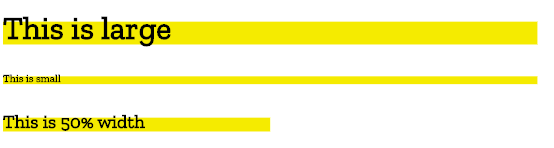
在上图中,背景与元素的大小成比例。第三个示例在块级元素上设置了 width: 50%,这使得元素变窄,因此背景图像也变窄。
Paint Worklet
实现此目的的代码如下所示:
registerPaint(
  "header-highlight",
  class {
    static get contextOptions() {
      return { alpha: true };
    }

    /*
     * ctx is the 2D drawing context
     * size is the paintSize, the dimensions (height and width) of the box being painted
     */
    paint(ctx, size) {
      ctx.fillStyle = "hsl(55 90% 60% / 100%)";
      ctx.fillRect(0, size.height / 3, size.width * 0.4, size.height * 0.6);
    }
  },
);
此代码示例与我们的第一个示例有两处不同:
- 我们包含了一个第二个参数,即 paint size。
- 我们将矩形的尺寸和位置改成了相对于元素盒大小的值,而不是绝对值。
我们可以将第二个参数传递给 paint() 函数,以便通过 .width 和 .height 属性访问元素的宽度和高度。
我们的标题现在有了一个高亮,该高亮会根据其大小而变化。
使用 Paint Worklet
HTML
<h1 class="fancy">Largest Header</h1>
<h6 class="fancy">Smallest Header</h6>
<h3 class="fancy half">50% width header</h3>
CSS
虽然你无法操作 worklet 的脚本,但你可以修改元素的 font-size 和 width 来改变背景图像的大小。
.fancy {
  background-image: paint(header-highlight);
}
.half {
  width: 50%;
}
JavaScript
CSS.paintWorklet.addModule("header-highlight.js");
结果
在 支持 CSS Paint API 的浏览器中,下面示例中的元素应该获得与其字体大小成比例的黄色背景。
自定义属性
除了访问元素的大小之外,worklet 还可以访问 CSS 自定义属性和常规 CSS 属性。
registerPaint(
  "cssPaintFunctionName",
  class {
    static get inputProperties() {
      return ["PropertyName1", "--customPropertyName2"];
    }
    static get inputArguments() {
      return ["<color>"];
    }
    static get contextOptions() {
      return { alpha: true };
    }

    paint(drawingContext, elementSize, styleMap) {
      // Paint code goes here.
    }
  },
);
paint() 函数的三个参数包括绘制上下文、paint size 和属性。为了能够访问属性,我们包含了静态 inputProperties() 方法,它提供了对 CSS 属性的实时访问,包括常规属性和 自定义属性,并返回一个属性名称的 数组。我们将在最后一个部分探讨 inputArguments。
让我们创建一个带有背景图像的列表项,该图像在三种不同的颜色和三种宽度之间旋转。
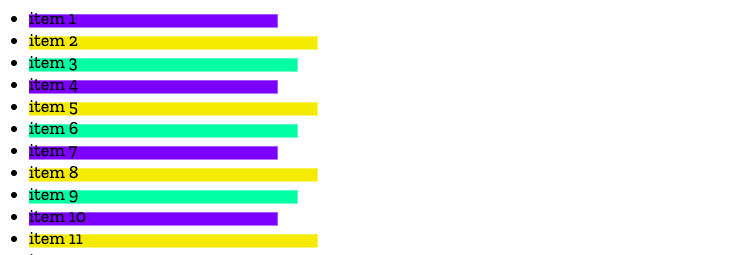
为了实现这一点,我们将定义两个自定义 CSS 属性:--box-color 和 --width-subtractor。
Paint Worklet
在我们的 worklet 中,我们可以引用这些自定义属性。
registerPaint(
  "boxbg",
  class {
    static get contextOptions() {
      return { alpha: true };
    }

    /*
     * use this function to retrieve any custom properties (or regular properties, such as 'height')
     * defined for the element, return them in the specified array
     */
    static get inputProperties() {
      return ["--box-color", "--width-subtractor"];
    }

    paint(ctx, size, props) {
      /*
       * ctx -> drawing context
       * size -> paintSize: width and height
       * props -> properties: get() method
       */
      ctx.fillStyle = props.get("--box-color");
      ctx.fillRect(
        0,
        size.height / 3,
        size.width * 0.4 - props.get("--width-subtractor"),
        size.height * 0.6,
      );
    }
  },
);
我们在 registerPaint() 类中使用了 inputProperties() 方法来获取应用于具有 boxbg 类的元素的两个自定义属性的值,然后将这些值用于我们的 paint() 函数。inputProperties() 方法可以返回影响元素的全部属性,而不仅仅是自定义属性。
使用 Paint Worklet
HTML
<ul>
  <li>item 1</li>
  <li>item 2</li>
  <li>item 3</li>
  <li>item 4</li>
  <li>item 5</li>
  <li>item 6</li>
  <li>item 7</li>
  <li>item 8</li>
  <li>item 9</li>
  <li>item 10</li>
  <li>item 11</li>
  <li>item 12</li>
  <li>item 13</li>
  <li>item 14</li>
  <li>item 15</li>
  <li>item 16</li>
  <li>item 17</li>
  <li>item</li>
</ul>
CSS
在我们的 CSS 中,我们定义了 --box-color 和 --width-subtractor 自定义属性。
li {
  background-image: paint(boxbg);
  --box-color: hsl(55 90% 60% / 100%);
}

li:nth-of-type(3n) {
  --box-color: hsl(155 90% 60% / 100%);
  --width-subtractor: 20;
}

li:nth-of-type(3n + 1) {
  --box-color: hsl(255 90% 60% / 100%);
  --width-subtractor: 40;
}
JavaScript
在我们的 <script> 中,我们注册了 worklet。
CSS.paintWorklet.addModule("boxbg.js");
结果
虽然你无法操作 worklet 的脚本,但你可以在 DevTools 中修改自定义属性值来改变背景图像的颜色和宽度。
增加复杂性
上面的示例可能看起来不太令人兴奋,因为你可以用现有的 CSS 属性以几种不同的方式重现它们,例如,通过定位一些装饰性的 生成内容 和 ::before,或者包含 background: linear-gradient(yellow, yellow) 0 15px / 200px 20px no-repeat; CSS Paint API 之所以如此有趣和强大,是因为你可以创建复杂的图像,传递变量,并自动调整大小。
让我们来看一个更复杂的 paint 示例。
Paint Worklet
registerPaint(
  "header-highlight",
  class {
    static get inputProperties() {
      return ["--high-color"];
    }
    static get contextOptions() {
      return { alpha: true };
    }

    paint(ctx, size, props) {
      /* set where to start the highlight & dimensions */
      const x = 0;
      const y = size.height * 0.3;
      const blockWidth = size.width * 0.33;
      const highlightHeight = size.height * 0.85;
      const color = props.get("--high-color");

      ctx.fillStyle = color;

      ctx.beginPath();
      ctx.moveTo(x, y);
      ctx.lineTo(blockWidth, y);
      ctx.lineTo(blockWidth + highlightHeight, highlightHeight);
      ctx.lineTo(x, highlightHeight);
      ctx.lineTo(x, y);
      ctx.closePath();
      ctx.fill();

      /* create the dashes */
      for (let start = 0; start < 8; start += 2) {
        ctx.beginPath();
        ctx.moveTo(blockWidth + start * 10 + 10, y);
        ctx.lineTo(blockWidth + start * 10 + 20, y);
        ctx.lineTo(
          blockWidth + start * 10 + 20 + highlightHeight,
          highlightHeight,
        );
        ctx.lineTo(
          blockWidth + start * 10 + 10 + highlightHeight,
          highlightHeight,
        );
        ctx.lineTo(blockWidth + start * 10 + 10, y);
        ctx.closePath();
        ctx.fill();
      }
    } // paint
  },
);
使用 Paint Worklet
然后,我们可以创建一个简单的 HTML 来接受此图像作为背景。
<h1 class="fancy">Largest Header</h1>
<h3 class="fancy">Medium size header</h3>
<h6 class="fancy">Smallest Header</h6>
我们为每个标题提供了不同的 --high-color 自定义属性值。
.fancy {
  background-image: paint(header-highlight);
}
h1 {
  --high-color: hsl(155 90% 60% / 70%);
}
h3 {
  --high-color: hsl(255 90% 60% / 50%);
}
h6 {
  --high-color: hsl(355 90% 60% / 30%);
}
然后我们注册我们的 worklet。
CSS.paintWorklet.addModule("header-highlight.js");
结果如下所示
虽然你无法编辑 worklet 本身,但你可以尝试修改 CSS 和 HTML。也许可以尝试在标题上使用 scale 和 rotate?
你可以尝试不使用 CSS Paint API 来创建上面的背景图像。这是可行的,但你必须为每个想要的颜色声明一个不同且相当复杂的线性渐变。使用 CSS Paint API,一个 worklet 可以被重用,例如在这里传入不同的颜色。
传递参数
注意: 以下示例需要启用 Chrome 或 Edge 中的实验性 Web Platform 功能标志,方法是访问 about://flags。
使用 CSS Paint API,我们不仅可以访问自定义属性和常规属性,还可以将自定义参数传递给 paint() 函数。
我们可以在 CSS 中调用函数时添加这些额外的参数。假设我们有时想描边背景而不是填充它——让我们为此场合传递一个额外的参数。
li {
  background-image: paint(hollow-highlights, stroke);
}
现在,我们可以在 registerPaint() 类中使用 inputArguments() 方法来访问我们添加到 paint() 函数中的自定义参数。
class Worklet {
  static get inputArguments() {
    return ["*"];
  }
  // …
}
然后我们就可以访问该参数了。
class Worklet {
  // …
  paint(ctx, size, props, args) {
    // use our custom arguments
    const hasStroke = args[0].toString();

    // if stroke arg is 'stroke', don't fill
    if (hasStroke === "stroke") {
      ctx.fillStyle = "transparent";
      ctx.strokeStyle = color;
    }
    // …
  }
  // …
}
我们还可以指定我们想要的参数类型。
假设我们添加第二个参数,指定我们想要的描边像素宽度。
li {
  background-image: paint(hollow-highlights, stroke, 10px);
}
当我们 get 我们的参数列表时,我们可以专门要求一个 <length> 单位。
class Worklet {
  // …
  static get inputArguments() {
    return ["*", "<length>"];
  }
  // …
}
在这种情况下,我们专门请求了 <length> 属性。返回数组的第一个元素将是 CSSUnparsedValue。第二个将是 CSSStyleValue。
如果自定义参数是 CSS 值,例如单位,我们可以通过在 registerPaint() 函数中检索它时使用值类型关键字来调用 Typed OM CSSStyleValue 类(及其子类)。
现在我们可以访问 type 和 value 属性,这意味着我们可以直接获得像素数和数字类型。(诚然,ctx.lineWidth 接受一个浮点数作为值而不是带有长度单位的值,但仅作示例……)
class Worklet {
  // …
  paint(ctx, size, props, args) {
    const strokeWidth = args[1];

    if (strokeWidth.unit === "px") {
      ctx.lineWidth = strokeWidth.value;
    } else {
      ctx.lineWidth = 1.0;
    }

    // …
  }
  // …
}
值得注意的是,使用自定义属性来控制 worklet 的不同部分与此处设置的参数之间的区别。自定义属性(实际上是样式图上的任何属性)是全局的——它们也可以在我们的 CSS(和 JS)的其他地方使用。
例如,你可能有一个 --main-color,它对于在 paint() 函数中设置颜色很有用,但也可以用于在 CSS 的其他地方设置颜色。如果你想专门更改它以用于 paint,可能会很困难。这就是自定义参数功能派上用场的地方。另一种思考方式是,参数用于控制你实际绘制的内容,而属性用于控制样式。
现在我们可以真正看到这个 API 的优势了,如果我们能够通过自定义属性和额外的 paint() 函数参数从 CSS 控制大量绘制参数,那么我们就可以真正开始构建可重用且高度可控的样式函数了。
Paint Worklet
registerPaint(
  "hollow-highlights",
  class {
    static get inputProperties() {
      return ["--box-color"];
    }
    // Input arguments that can be passed to the `paint` function
    static get inputArguments() {
      return ["*", "<length>"];
    }

    static get contextOptions() {
      return { alpha: true };
    }

    paint(ctx, size, props, args) {
      // ctx   -> drawing context
      // size  -> size of the box being painted
      // props -> list of custom properties available to the element
      // args  -> list of arguments set when calling the paint() function in the CSS

      // where to start the highlight & dimensions
      const x = 0;
      const y = size.height * 0.3;
      const blockWidth = size.width * 0.33;
      const blockHeight = size.height * 0.85;

      // the values passed in the paint() function in the CSS
      const color = props.get("--box-color");
      const strokeType = args[0].toString();
      const strokeWidth = parseInt(args[1], 10);

      // set the stroke width
      ctx.lineWidth = strokeWidth ?? 1.0;
      // set the fill type
      if (strokeType === "stroke") {
        ctx.fillStyle = "transparent";
        ctx.strokeStyle = color;
      } else if (strokeType === "filled") {
        ctx.fillStyle = color;
        ctx.strokeStyle = color;
      } else {
        ctx.fillStyle = "none";
        ctx.strokeStyle = "none";
      }

      // block
      ctx.beginPath();
      ctx.moveTo(x, y);
      ctx.lineTo(blockWidth, y);
      ctx.lineTo(blockWidth + blockHeight, blockHeight);
      ctx.lineTo(x, blockHeight);
      ctx.lineTo(x, y);
      ctx.closePath();
      ctx.fill();
      ctx.stroke();
      // dashes
      for (let i = 0; i < 4; i++) {
        let start = i * 2;
        ctx.beginPath();
        ctx.moveTo(blockWidth + start * 10 + 10, y);
        ctx.lineTo(blockWidth + start * 10 + 20, y);
        ctx.lineTo(blockWidth + start * 10 + 20 + blockHeight, blockHeight);
        ctx.lineTo(blockWidth + start * 10 + 10 + blockHeight, blockHeight);
        ctx.lineTo(blockWidth + start * 10 + 10, y);
        ctx.closePath();
        ctx.fill();
        ctx.stroke();
      }
    } // paint
  },
);
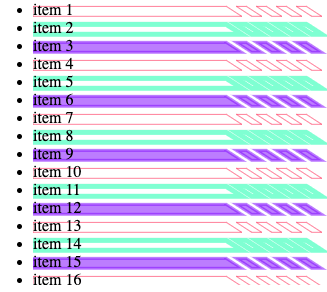
使用 Paint Worklet
我们可以设置不同的颜色、描边宽度,并选择背景图像是填充还是镂空。
li {
  --box-color: hsl(155 90% 60% / 50%);
  background-image: paint(hollow-highlights, stroke, 5px);
}

li:nth-of-type(3n) {
  --box-color: hsl(255 90% 60% / 50%);
  background-image: paint(hollow-highlights, filled, 3px);
}

li:nth-of-type(3n + 1) {
  --box-color: hsl(355 90% 60% / 50%);
  background-image: paint(hollow-highlights, stroke, 1px);
}
在我们的 <script> 中,我们注册了 worklet。
CSS.paintWorklet.addModule("hollow.js");