使用 MediaStream Recording API
The MediaStream Recording API makes it easy to record audio and/or video streams. When used with navigator.mediaDevices.getUserMedia(), it provides an easy way to record from the user's input devices and instantly use the result in web apps.
Both audio and video may be recorded, separately or together. This article aims to provide a basic guide on how to use the MediaRecorder interface, which provides this API.
示例应用程序:Web 录音机
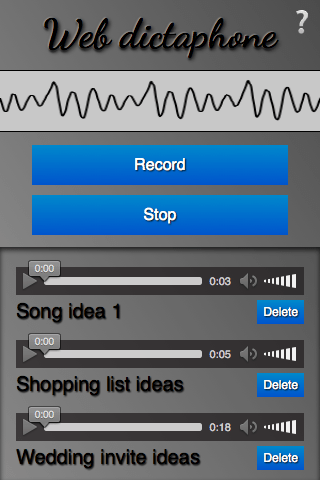
To demonstrate basic usage of the MediaStream Recording API, we have built a web-based dictaphone. It allows you to record snippets of audio and then play them back. It even gives you a visualization of your device's sound input, using the Web Audio API. We'll concentrate on the recording and playback functionality for this article.
You can see this demo running live, or grab the source code on GitHub.
CSS 好东西
The HTML is pretty simple in this app, so we won't go through it here; there are a couple of slightly more interesting bits of CSS worth mentioning, however, so we'll discuss them below. If you are not interested in CSS and want to get straight to the JavaScript, skip to the Basic app setup section.
使用 calc() 使界面始终约束在视窗内,无论设备高度如何
The calc() function is one of those useful little utility features that's cropped up in CSS that doesn't look like much initially, but soon starts to make you think "Wow, why didn't we have this before? Why was CSS2 layout so awkward?" It allows you do a calculation to determine the computed value of a CSS unit, mixing different units in the process.
例如,在 Web 录音机中,我们有三个主要 UI 区域,垂直堆叠。我们想让前两个(标题和控件)具有固定高度
header {
  height: 70px;
}

.main-controls {
  padding-bottom: 0.7rem;
  height: 170px;
}
但是,我们希望使第三个区域(包含可以播放的已录制样本)占据剩余的所有空间,无论设备高度如何。Flexbox 可以解决此问题,但这对于如此简单的布局来说有点过分。相反,我们通过使第三个容器的高度等于父高度的 100%,减去另外两个容器的高度和填充来解决问题
.sound-clips {
  box-shadow: inset 0 3px 4px rgb(0 0 0 / 70%);
  background-color: rgb(0 0 0 / 10%);
  height: calc(100% - 240px - 0.7rem);
  overflow: scroll;
}
用于显示/隐藏的复选框技巧
这已经相当有文档记录了,但我们认为应该提到复选框技巧,它利用了您可以单击复选框的 <label> 来切换其选中/未选中状态这一事实。在 Web 录音机中,它为信息屏幕提供支持,可以通过单击右上角的问号图标来显示/隐藏信息屏幕。首先,我们根据需要对 <label> 进行样式设置,确保它具有足够的 z-index 始终位于其他元素之上,因此可以获得焦点/可点击
label {
  font-family: "NotoColorEmoji";
  font-size: 3rem;
  position: absolute;
  top: 2px;
  right: 3px;
  z-index: 5;
  cursor: pointer;
}
然后,我们隐藏实际的复选框,因为我们不想让它占用我们的 UI 空间
input[type="checkbox"] {
  position: absolute;
  top: -100px;
}
接下来,我们根据需要对信息屏幕(包装在一个 <aside> 元素中)进行样式设置,赋予它固定位置,使其不会出现在布局流中并影响主 UI,将它变换到我们希望它默认处于的位置,并赋予它过渡效果,以实现平滑的显示/隐藏
aside {
  position: fixed;
  top: 0;
  left: 0;
  text-shadow: 1px 1px 1px black;
  width: 100%;
  height: 100%;
  transform: translateX(100%);
  transition: 0.6s all;
  background-color: #999;
  background-image: linear-gradient(
    to top right,
    rgb(0 0 0 / 0%),
    rgb(0 0 0 / 50%)
  );
}
最后,我们编写一个规则来规定,当复选框被选中时(当我们单击/聚焦标签时),相邻的 <aside> 元素的水平平移值将发生变化,并平滑地过渡到可见状态
input[type="checkbox"]:checked ~ aside {
  transform: translateX(0);
}
基本应用程序设置
为了获取我们想要捕获的媒体流,我们使用 getUserMedia()。然后,我们使用 MediaStream Recording API 来录制流,并将每个录制的片段输出到生成的 <audio> 元素的源代码中,以便可以播放它。
我们将声明一些用于录制和停止按钮的变量,以及将包含生成的音频播放器的 <article>
const record = document.querySelector(".record");
const stop = document.querySelector(".stop");
const soundClips = document.querySelector(".sound-clips");
最后,在本节中,我们设置了基本的 getUserMedia 结构
if (navigator.mediaDevices && navigator.mediaDevices.getUserMedia) {
  console.log("getUserMedia supported.");
  navigator.mediaDevices
    .getUserMedia(
      // constraints - only audio needed for this app
      {
        audio: true,
      },
    )

    // Success callback
    .then((stream) => {})

    // Error callback
    .catch((err) => {
      console.error(`The following getUserMedia error occurred: ${err}`);
    });
} else {
  console.log("getUserMedia not supported on your browser!");
}
整个内容都包装在一个测试中,该测试检查 getUserMedia 是否受支持,然后再运行任何其他内容。接下来,我们调用 getUserMedia(),并在其中定义
- 约束:我们的录音机只捕获音频。
- 成功回调:此代码在
getUserMedia调用成功完成后运行。 - 错误/失败回调:如果
getUserMedia调用由于任何原因而失败,则运行此代码。
注意:以下所有代码都放在 getUserMedia 成功回调中。
捕获媒体流
一旦 getUserMedia 成功创建了媒体流,您就可以使用 MediaRecorder() 构造函数使用该流创建一个新的 Media Recorder 实例。这是您开始使用 MediaStream Recording API 的入口点 - 流现在已准备就绪,可以捕获到一个 Blob 中,以您的浏览器的默认编码格式进行编码。
const mediaRecorder = new MediaRecorder(stream);
在 MediaRecorder 接口中提供了一系列方法,使您可以控制媒体流的录制;在 Web 录音机中,我们只使用两个方法,并监听一些事件。首先,MediaRecorder.start() 用于在按下录制按钮后开始录制流
record.onclick = () => {
  mediaRecorder.start();
  console.log(mediaRecorder.state);
  console.log("recorder started");
  record.style.background = "red";
  record.style.color = "black";
};
当 MediaRecorder 正在录制时,MediaRecorder.state 属性将返回一个值为“recording”的值。
随着录制的进行,我们需要收集音频数据。我们使用 ondataavailable 注册一个事件处理程序来执行此操作
let chunks = [];

mediaRecorder.ondataavailable = (e) => {
  chunks.push(e.data);
};
注意:浏览器将在需要时触发 dataavailable 事件,但如果您想介入,您也可以在调用 start() 方法时包含一个时间切片(例如 start(10000))来控制此间隔,或者调用 MediaRecorder.requestData() 来在需要时触发一个事件。
最后,我们使用 MediaRecorder.stop() 方法在按下停止按钮时停止录制,并将准备好在应用程序中其他地方使用的 Blob 终结。
stop.onclick = () => {
  mediaRecorder.stop();
  console.log(mediaRecorder.state);
  console.log("recorder stopped");
  record.style.background = "";
  record.style.color = "";
};
请注意,如果媒体流结束,录制也可能会自然停止(例如,如果您正在获取歌曲轨道,而轨道已结束,或者用户停止共享其麦克风)。
获取和使用 Blob
录制停止后,state 属性将返回一个值为“inactive”的值,并会触发一个停止事件。我们使用 onstop 注册一个事件处理程序,并在其中从我们收到的所有块中终结我们的 Blob
mediaRecorder.onstop = (e) => {
  console.log("recorder stopped");

  const clipName = prompt("Enter a name for your sound clip");

  const clipContainer = document.createElement("article");
  const clipLabel = document.createElement("p");
  const audio = document.createElement("audio");
  const deleteButton = document.createElement("button");

  clipContainer.classList.add("clip");
  audio.setAttribute("controls", "");
  deleteButton.textContent = "Delete";
  clipLabel.textContent = clipName;

  clipContainer.appendChild(audio);
  clipContainer.appendChild(clipLabel);
  clipContainer.appendChild(deleteButton);
  soundClips.appendChild(clipContainer);

  const blob = new Blob(chunks, { type: "audio/ogg; codecs=opus" });
  chunks = [];
  const audioURL = window.URL.createObjectURL(blob);
  audio.src = audioURL;

  deleteButton.onclick = (e) => {
    let evtTgt = e.target;
    evtTgt.parentNode.parentNode.removeChild(evtTgt.parentNode);
  };
};
让我们看一下上面的代码,看看发生了什么。
首先,我们会显示一个提示,要求用户为其剪辑命名。
接下来,我们创建以下 HTML 结构,将其插入到我们的剪辑容器中,该容器是一个 <article> 元素。
<article class="clip">
  <audio controls></audio>
  <p>your clip name</p>
  <button>Delete</button>
</article>
之后,我们从录制的音频块创建一个组合的 Blob,并使用 window.URL.createObjectURL(blob) 创建一个指向它的对象 URL。然后,我们将 <audio> 元素的 src 属性的值设置为对象 URL,以便在按下音频播放器的播放按钮时,它将播放 Blob。
最后,我们为删除按钮设置一个 onclick 处理程序,使其成为一个函数,用于删除整个剪辑 HTML 结构。
规范
| 规范 |
|---|
| MediaStream Recording # mediarecorder-api |
浏览器兼容性
BCD 表格只能在启用 JavaScript 的浏览器中加载。
另请参阅
- Media Capture and Streams API landing page
MediaDevices.getUserMedia()