使用 Web Speech API
Web Speech API 提供两个独立的功能领域:语音识别和语音合成(也称为文本转语音,或 TTS),这为可访问性和控制开辟了有趣的可能性。本文介绍了这两个领域,并提供了演示。
语音识别
语音识别涉及从设备的麦克风(或从音轨)接收音频,然后由语音识别服务进行检查。当服务成功识别一个单词或短语时,它会返回一个文本字符串(或字符串列表),您可以用于启动进一步的操作。
Web Speech API 为此提供了一个主控制器接口 — SpeechRecognition — 以及几个用于表示结果的相关接口。
通常,用户设备上可用的语音识别系统用于语音识别。大多数现代操作系统都有一个用于发出语音命令的语音识别系统,例如 macOS 上的 Dictation 或 Windows 上的 Copilot。
默认情况下,在网页上使用语音识别涉及基于服务器的识别引擎。您的音频将发送到 Web 服务进行识别处理,因此它无法离线工作。
为了提高隐私和性能,您可以指定在设备上执行语音识别。这确保了音频和转录的语音都不会发送到第三方服务进行处理。我们将在设备上的语音识别部分更详细地介绍设备上的功能。
演示
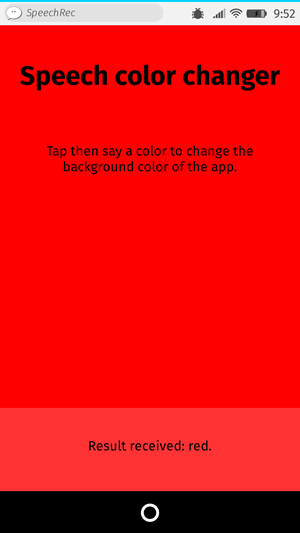
为了演示如何使用语音识别,我们创建了一个名为语音颜色转换器的示例应用程序。按下开始识别按钮后,说出一个 HTML 颜色关键字。应用程序的背景颜色将变为该颜色。

HTML 和 CSS
应用程序的 HTML 和 CSS 是基础的。有一个标题,一个说明段落(<p>),一个控制<button>,以及一个输出段落,我们在此显示诊断消息,包括我们应用程序识别的单词。
<h1>Speech color changer</h1>

<p class="hints"></p>

<button>Start recognition</button>

<p class="output"><em>...diagnostic messages</em></p>
CSS 提供了基本的响应式样式,使其在不同设备上看起来都很好。
JavaScript
让我们更详细地了解一下 JavaScript。
带前缀的属性
一些浏览器目前支持带前缀属性的语音识别。因此,在我们的代码开头,我们包含这些行以同时支持带前缀的属性和无前缀版本
const SpeechRecognition =
  window.SpeechRecognition || window.webkitSpeechRecognition;
const SpeechRecognitionEvent =
  window.SpeechRecognitionEvent || window.webkitSpeechRecognitionEvent;
颜色列表
我们代码的下一部分定义了一些示例颜色,我们将其打印到 UI 中,以便用户了解要说什么
const colors = [
  "aqua",
  "azure",
  "beige",
  "bisque",
  "black",
  "blue",
  "brown",
  "chocolate",
  "coral",
  // …
];
创建语音识别实例
接下来,我们定义一个语音识别实例来控制应用程序中的识别。我们通过使用SpeechRecognition()构造函数来做到这一点。
const recognition = new SpeechRecognition();
然后我们设置识别实例的一些属性
SpeechRecognition.continuous:控制是连续捕获结果 (true) 还是每次识别开始时只捕获一次 (false)。SpeechRecognition.lang:设置识别的语言。明确设置此项是推荐的最佳实践。SpeechRecognition.interimResults:定义语音识别系统是应返回中间结果还是仅返回最终结果。对于此演示,最终结果就足够了。SpeechRecognition.maxAlternatives:设置每个结果应返回的备选潜在匹配的数量。这有时可能很有用,例如如果结果不完全清晰并且您希望显示一个备选列表供用户选择。但此演示不需要,所以我们只指定一个(反正这也是默认值)。
recognition.continuous = false;
recognition.lang = "en-US";
recognition.interimResults = false;
recognition.maxAlternatives = 1;
启动语音识别
在获取到输出段落、<html> 元素、指令段落和 <button> 的引用后,我们实现了一个 onclick 处理程序。当用户按下按钮时,语音识别服务通过调用 SpeechRecognition.start() 开始。我们还使用了 forEach() 方法输出彩色指示器,显示用户可以尝试说出哪些颜色。
const diagnostic = document.querySelector(".output");
const bg = document.querySelector("html");
const hints = document.querySelector(".hints");
const startBtn = document.querySelector("button");

const colorHTML = colors
  .map((v) => `<span style="background-color:${v};">${v}</span>`)
  .join("");
hints.innerHTML = `Press the button then say a color to change the background color of the app. Try ${colorHTML}.`;

startBtn.onclick = () => {
  recognition.start();
  console.log("Ready to receive a color command.");
};
接收和处理结果
语音识别启动后,将有几个事件处理程序可用,您可以使用它们来检索结果和其他相关信息(请参阅 事件 以了解 SpeechRecognition)。最常见的是 result 事件,它在成功接收结果后触发
recognition.onresult = (event) => {
  const color = event.results[0][0].transcript;
  diagnostic.textContent = `Result received: ${color}.`;
  bg.style.backgroundColor = color;
  console.log(`Confidence: ${event.results[0][0].confidence}`);
};
第二行有点复杂,所以我们在这里解释每个部分
SpeechRecognitionEvent.results属性返回一个SpeechRecognitionResultList对象,其中包含SpeechRecognitionResult对象。它有一个 getter,因此可以像数组一样访问 — 第一个[0]返回位置0的SpeechRecognitionResult。- 每个
SpeechRecognitionResult对象又包含SpeechRecognitionAlternative对象,每个对象代表一个单独的识别词。这些也都有 getter,因此可以像数组一样访问 — 第二个[0]返回位置0的SpeechRecognitionAlternative。 SpeechRecognitionAlternative的transcript属性返回一个包含识别文本的字符串。此值随后用于将背景颜色设置为识别到的颜色,并将其作为诊断消息报告到 UI 中。
我们还使用 speechend 事件在识别到一个单词后停止语音识别服务(使用 SpeechRecognition.stop())
recognition.onspeechend = () => {
  recognition.stop();
};
处理错误和未识别的语音
最后两个处理程序涵盖了未识别口语词或识别发生错误的情况。nomatch 事件应该处理第一种情况,尽管在大多数情况下,识别引擎会返回一些东西,即使它难以理解
recognition.onnomatch = (event) => {
  diagnostic.textContent = "I didn't recognize that color.";
};
error 事件处理识别出现实际错误的情况 — SpeechRecognitionErrorEvent.error 属性包含返回的错误
recognition.onerror = (event) => {
  diagnostic.textContent = `Error occurred in recognition: ${event.error}`;
};
设备上的语音识别
语音识别通常使用在线服务进行。这意味着音频录音会发送到服务器进行处理,然后结果返回到浏览器。这有两个问题
- 隐私:许多用户不愿意将他们的语音发送到服务器。
- 性能:将数据发送到服务器进行每一次识别可能会在更密集型应用程序中降低性能,并且您的应用程序无法离线工作。
为了缓解这些问题,Web Speech API 允许您指定语音识别应由浏览器在设备上处理。这需要为每种要识别的语言一次性下载语言包;一旦安装,该功能将可离线使用。
本节解释如何使用设备上的语音识别。
演示
为了演示设备上的语音识别,我们创建了一个名为设备上的语音颜色转换器的示例应用程序(运行实时演示)。
此演示与前面讨论的在线语音颜色转换器演示的工作方式非常相似,区别如下。
指定设备上识别
要指定您想使用浏览器的设备上处理,请在开始任何语音识别之前将 SpeechRecognition.processLocally 属性设置为 true(默认值为 false)
recognition.processLocally = true;
检查可用性并安装语言包
为了使设备上的语音识别工作,浏览器必须安装您要识别的语言的语言包。如果在指定 processLocally = true 后运行 start() 方法,但未安装正确的语言包,则函数调用将失败并出现 language-not-supported 错误。
要安装正确的语言包,请确保遵循以下两个步骤
- 检查用户设备上是否提供语言包:这通过
SpeechRecognition.available()静态方法进行处理。 - 如果语言包不可用,则安装语言包:这通过
SpeechRecognition.install()静态方法进行处理。
这些步骤在应用程序控制 <button> 上的以下 click 事件处理程序中处理
startBtn.addEventListener("click", () => {
  // check availability of target language
  SpeechRecognition.available({ langs: ["en-US"], processLocally: true }).then(
    (result) => {
      if (result === "unavailable") {
        diagnostic.textContent = `en-US is not available to download at this time. Sorry!`;
      } else if (result === "available") {
        recognition.start();
        console.log("Ready to receive a color command.");
      } else {
        diagnostic.textContent = `en-US language pack is downloading...`;
        SpeechRecognition.install({
          langs: ["en-US"],
          processLocally: true,
        }).then((result) => {
          if (result) {
            diagnostic.textContent = `en-US language pack downloaded. Start recognition again.`;
          } else {
            diagnostic.textContent = `en-US language pack failed to download. Try again later.`;
          }
        });
      }
    },
  );
});
available() 方法接受一个包含两个属性的选项对象
- 一个
langs数组,其中包含要检查可用性的语言。 - 一个
processLocally布尔值,指定是仅在设备上检查语言的可用性 (true) 还是 通过本地或基于服务器的识别服务检查 (false,默认值)。
运行时,此方法返回一个 Promise,该 Promise 解析为一个枚举值,指示指定语言的可用性。在我们的演示中,我们测试了三种情况
- 如果结果值为
unavailable,则表示没有合适的语言包可供下载。我们还会向输出打印一条相应的消息。 - 如果结果值为
available,则表示语言包可在本地使用,因此可以开始识别。在这种情况下,我们运行start()并在应用程序准备好接收语音时将消息记录到控制台。 - 如果该值是其他值(
downloadable或downloading),我们打印一条诊断消息,通知用户语言包下载正在开始,然后运行install()方法来处理下载。
install() 方法的工作方式与 available() 方法类似,只是其选项对象只接受 langs 数组。运行时,它开始下载 langs 中指示的所有语言的语言包,并返回一个 Promise,该 Promise 解析为一个布尔值,指示指定的语言包是否成功下载并安装 (true) 或未成功 (false)。
对于此演示,我们打印一条诊断消息以指示成功和失败情况。在一个更完整的应用程序中,您可能会在下载过程中禁用控件,并在 Promise 解析后重新启用它们。
权限策略集成
available() 和 install() 方法的使用受 on-device-speech-recognition Permissions-Policy 的控制。具体来说,如果定义的策略阻止使用,则任何调用这些方法的尝试都将失败。
on-device-speech-recognition 的默认允许列表值为 self。这意味着您无需担心调整策略,除非您尝试在嵌入式跨源文档中使用这些方法或希望明确禁用它们的使用。
无前缀的 Web Speech API
在原始的语音颜色转换器演示中,我们包含了额外的行来处理仅支持带有供应商前缀属性的 Web Speech API 的浏览器(有关详细信息,请参阅带前缀的属性部分)。
在演示的设备上版本中,不需要前缀处理代码,因为支持此功能的实现没有前缀。
语音识别中的上下文偏差
有时语音识别服务会无法正确识别特定的单词或短语。这最常发生在特定领域的术语(例如医学或科学词汇)、专有名词、不常见的短语或听起来与其他单词相似并可能被错误识别的单词。
例如,在测试期间,我们发现我们的设备上的语音颜色转换器难以识别颜色 azure — 它总是返回类似“as you”的结果。其他经常被误识别的颜色包括 khaki (“car key”)、tan 和 thistle (“this all”)。
为了缓解此类问题,Web Speech API 允许您向识别引擎提供提示,以突出更可能被说出的短语,并且引擎应该偏向于这些短语。这使得这些单词和短语更有可能被正确识别。
您可以通过将 SpeechRecognitionPhrase 对象的数组设置为 SpeechRecognition.phrases 属性的值来做到这一点。每个 SpeechRecognitionPhrase 对象包含
- 一个
phrase属性,它是一个包含您要提升的单词或短语的字符串。 - 一个
boost属性,它是一个介于0.0和10.0(包括)之间的浮点数,用于设置您要应用于该单词或短语的提升量。值越高,单词或短语被识别的可能性越大。
在我们的“设备上的语音颜色转换器”演示中,我们通过创建要提升的短语数组及其提升值来处理此问题
const phraseData = [
  { phrase: "azure", boost: 5.0 },
  { phrase: "khaki", boost: 3.0 },
  { phrase: "tan", boost: 2.0 },
];
这些需要表示为 SpeechRecognitionPhrase 对象的 ObservableArray。我们通过映射原始数组来处理此问题,使用 SpeechRecognitionPhrase() 构造函数将每个数组元素转换为 SpeechRecognitionPhrase 对象
const phraseObjects = phraseData.map(
  (p) => new SpeechRecognitionPhrase(p.phrase, p.boost),
);
创建 SpeechRecognition 实例后,我们通过将 phraseObjects 数组设置为 SpeechRecognition.phrases 属性的值来添加我们的上下文偏差短语
recognition.phrases = phraseObjects;
短语数组可以像普通的 JavaScript 数组一样进行修改,例如通过动态地向其推送新短语
recognition.phrases.push(new SpeechRecognitionPhrase("thistle", 5.0));
有了这段代码,我们发现有问题的颜色关键字比以前识别得更准确了。
语音合成
语音合成(又称文本转语音,或 TTS)涉及将应用程序中包含的文本合成为语音,并通过设备的扬声器或音频输出连接播放。
Web Speech API 为此提供了一个主控制器接口 — SpeechSynthesis — 以及一些密切相关的接口,用于表示要合成的文本(称为话语)、用于话语的语音等。同样,大多数操作系统都具有某种语音合成系统,该 API 将根据可用性用于此任务。
演示
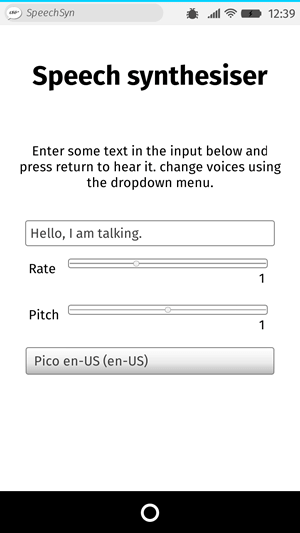
为了演示如何使用 Web 语音合成,我们创建了一个名为语音合成器的示例应用程序。它有一个输入字段,用于输入要合成的文本。您可以调整语速和音高,还可以从下拉菜单中选择一个语音用于朗读文本。输入文本后,按 Enter/Return 或单击播放按钮即可听到文本朗读。

HTML 和 CSS
此应用程序的 HTML 和 CSS 都非常基础。有一个标题、一些使用说明和一个带有一些基本控件的表单。<select> 元素最初是空的;它通过 JavaScript(稍后介绍)填充了 <option> 元素。
<h1>Speech synthesizer</h1>

<p>
  Enter some text in the input below and press return to hear it. Change voices
  using the dropdown menu.
</p>

<form>
  <input type="text" class="txt" />
  <div>
    <label for="rate">Rate</label
    ><input type="range" min="0.5" max="2" value="1" step="0.1" id="rate" />
    <div class="rate-value">1</div>
    <div class="clearfix"></div>
  </div>
  <div>
    <label for="pitch">Pitch</label
    ><input type="range" min="0" max="2" value="1" step="0.1" id="pitch" />
    <div class="pitch-value">1</div>
    <div class="clearfix"></div>
  </div>
  <select></select>
</form>
JavaScript
让我们研究一下为这个应用程序提供动力的 JavaScript。
设置变量
首先,我们捕获了 UI 中涉及的所有 DOM 元素的引用,但更有趣的是,我们捕获了 Window.speechSynthesis 的引用。这是 API 的入口点——它返回 SpeechSynthesis 的实例,即 Web 语音合成的控制器接口。
const synth = window.speechSynthesis;

const inputForm = document.querySelector("form");
const inputTxt = document.querySelector(".txt");
const voiceSelect = document.querySelector("select");

const pitch = document.querySelector("#pitch");
const pitchValue = document.querySelector(".pitch-value");
const rate = document.querySelector("#rate");
const rateValue = document.querySelector(".rate-value");

const voices = [];
填充 select 元素
为了用设备可用的不同语音选项填充 <select> 元素,我们编写了一个 populateVoiceList() 函数。我们首先调用 SpeechSynthesis.getVoices(),它返回所有可用语音的列表,这些语音由 SpeechSynthesisVoice 对象表示。然后我们遍历此列表 — 对于每个语音,我们创建一个 <option> 元素,将其文本内容设置为显示语音的名称(从 SpeechSynthesisVoice.name 获取)、语音的语言(从 SpeechSynthesisVoice.lang 获取),如果语音是合成引擎的默认语音,则显示 -- DEFAULT(通过检查 SpeechSynthesisVoice.default 是否返回 true 来检查)。
我们还为每个选项创建了 data- 属性,其中包含关联语音的名称和语言,以便我们以后可以轻松获取它们,然后将选项作为 select 的子元素追加。
function populateVoiceList() {
  voices = synth.getVoices();

  for (const voice of voices) {
    const option = document.createElement("option");
    option.textContent = `${voice.name} (${voice.lang})`;

    if (voice.default) {
      option.textContent += " — DEFAULT";
    }

    option.setAttribute("data-lang", voice.lang);
    option.setAttribute("data-name", voice.name);
    voiceSelect.appendChild(option);
  }
}
较旧的浏览器不支持 voiceschanged 事件,并且在触发 SpeechSynthesis.getVoices() 时只返回语音列表。而在其他浏览器(如 Chrome)上,您必须等到事件触发后才能填充列表。为了同时支持这两种情况,我们按如下所示运行函数
populateVoiceList();
if (speechSynthesis.onvoiceschanged !== undefined) {
  speechSynthesis.onvoiceschanged = populateVoiceList;
}
朗读输入的文本
接下来,我们创建一个事件处理程序,以开始朗读文本字段中输入的文本。我们正在使用表单上的 onsubmit 处理程序,以便在按下 Enter/Return 时执行此操作。我们首先使用其构造函数创建一个新的 SpeechSynthesisUtterance() 实例——这将文本输入的值作为参数传递。
接下来,我们需要确定要使用哪种语音。我们使用 HTMLSelectElement 的 selectedOptions 属性来返回当前选定的 <option> 元素。然后,我们使用此元素的 data-name 属性,找到名称与此属性值匹配的 SpeechSynthesisVoice 对象。我们将匹配的语音对象设置为 SpeechSynthesisUtterance.voice 属性的值。
最后,我们将 SpeechSynthesisUtterance.pitch 和 SpeechSynthesisUtterance.rate 设置为相关范围表单元素的值。然后,在完成所有必要的准备工作后,我们通过调用 SpeechSynthesis.speak() 来开始朗读,将 SpeechSynthesisUtterance 实例作为参数传递给它。
inputForm.onsubmit = (event) => {
  event.preventDefault();

  const utterThis = new SpeechSynthesisUtterance(inputTxt.value);
  const selectedOption =
    voiceSelect.selectedOptions[0].getAttribute("data-name");
  for (const voice of voices) {
    if (voice.name === selectedOption) {
      utterThis.voice = voice;
    }
  }
  utterThis.pitch = pitch.value;
  utterThis.rate = rate.value;
  synth.speak(utterThis);
  utterThis.onpause = (event) => {
    const char = event.utterance.text.charAt(event.charIndex);
    console.log(
      `Speech paused at character ${event.charIndex} of "${event.utterance.text}", which is "${char}".`,
    );
  };
  inputTxt.blur();
};
在处理程序的最后一部分,我们包含一个 pause 事件,以演示如何有效地利用 SpeechSynthesisEvent。当调用 SpeechSynthesis.pause() 时,它会返回一条消息,报告语音暂停时的字符编号和名称。
最后,我们在文本输入上调用 blur()。这主要是为了在 Firefox OS 上隐藏键盘。
更新显示的音高和语速值
代码的最后一部分会在每次滑块位置移动时更新 UI 中显示的 pitch/rate 值。
pitch.onchange = () => {
  pitchValue.textContent = pitch.value;
};

rate.onchange = () => {
  rateValue.textContent = rate.value;
};