Web 音频空间化基础知识
除了它丰富多样的声音处理(和其他)选项之外,Web Audio API 还提供了设施,让您能够模拟声音在听众围绕声源移动时的差异,例如在 3D 游戏中围绕声源移动时的声像定位。这个官方术语称为 **空间化**,本文将介绍实现此类系统的基础知识。
空间化基础
在 Web Audio 中,复杂的 3D 空间化是通过 PannerNode 创建的,用通俗的话说,它本质上是大量的酷炫数学计算,用于使音频出现在 3D 空间中。想象声音从您头顶飞过,从您身后悄悄靠近,或者从您面前掠过。诸如此类。
它对于 WebXR 和游戏来说非常有用。在 3D 空间中,这是实现逼真音频的唯一方法。像 three.js 和 A-frame 这样的库在处理声音时会利用它的潜力。值得注意的是,您不必在完整的 3D 空间中移动声音——您可以只停留在 2D 平面上,因此如果您计划开发 2D 游戏,这仍然是您需要的节点。
注意:还有一个 StereoPannerNode,用于处理创建简单的左右立体声声像效果的常见用例。它使用起来简单得多,但显然远不如 PannerNode 灵活。如果您只需要简单的立体声声像效果,我们的 StereoPannerNode 示例(查看源代码)应该能满足您的所有需求。
3D Boombox 演示
为了演示 3D 空间化,我们修改了我们在基础 使用 Web Audio API 指南中创建的 Boombox 演示版本。查看 实时 3D 空间化演示(也可以查看 源代码)。
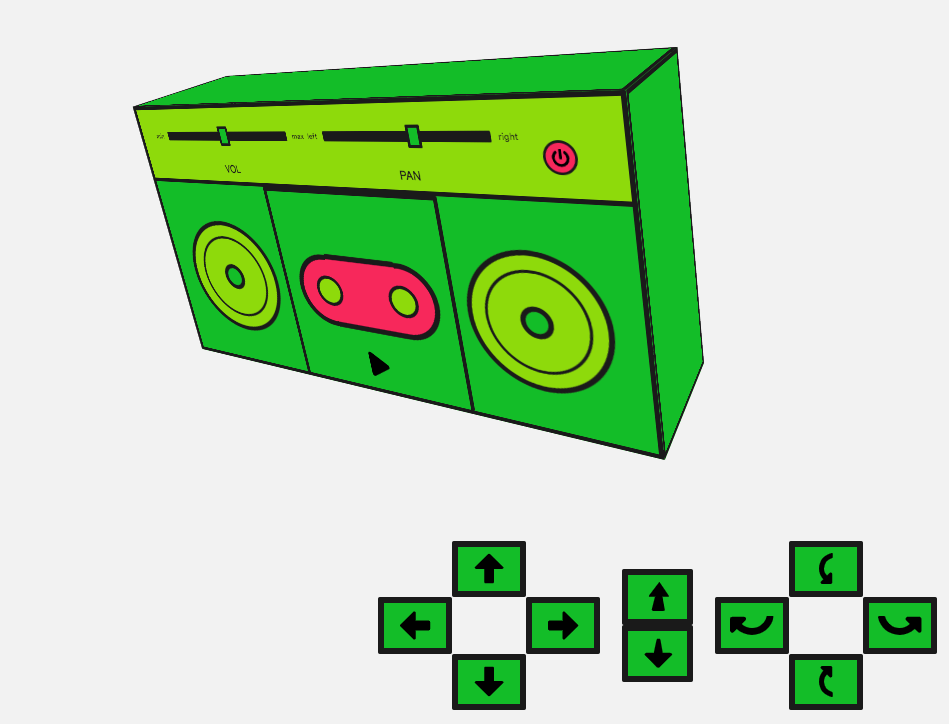
Boombox 放置在一个房间内(由浏览器视口边缘定义),在此演示中,我们可以通过提供的控件来移动和旋转它。当我们移动 Boombox 时,它产生的声音也会相应变化,当它移动到房间的左侧或右侧时会进行声像定位,或者当它远离用户时或旋转后扬声器背对着用户时会变小等等。这是通过根据该移动设置 PannerNode 对象实例的各种属性来实现的,以模拟空间化。
注意:如果您使用耳机或将您的计算机连接到某种环绕声系统,体验会更好。
创建音频监听器
那么,让我们开始吧!BaseAudioContext(AudioContext 继承自的接口)有一个 listener 属性,它返回一个 AudioListener 对象。这代表了场景中的监听者,通常是您的用户。您可以定义他们在空间中的位置以及他们面向的方向。他们保持静态。然后,pannerNode 可以计算其声音相对于监听者位置的位置。
让我们创建上下文和监听者,并设置监听者的位置以模拟一个人看向我们的房间
const audioCtx = new AudioContext();
const listener = audioCtx.listener;

const posX = window.innerWidth / 2;
const posY = window.innerHeight / 2;
const posZ = 300;

listener.positionX.value = posX;
listener.positionY.value = posY;
listener.positionZ.value = posZ - 5;
我们可以使用 positionX 向左或向右移动监听者,使用 positionY 向上或向下移动,或者使用 positionZ 移入或移出房间。在这里,我们将监听者设置在视口中间,并略微位于我们的 Boombox 前面。我们还可以设置监听者的朝向。这些属性的默认值效果很好。
listener.forwardX.value = 0;
listener.forwardY.value = 0;
listener.forwardZ.value = -1;
listener.upX.value = 0;
listener.upY.value = 1;
listener.upZ.value = 0;
forward 属性代表监听者前方方向(例如,他们面向的方向)的 3D 坐标位置,而 up 属性代表监听者头顶的 3D 坐标位置。这两者结合可以很好地设置方向。
创建 PannerNode
让我们创建我们的 PannerNode。它有许多相关的属性。让我们一一查看。
首先,我们可以设置 panningModel。这是用于在 3D 空间中定位音频的空间化算法。我们可以将其设置为:
equalpower — 默认值,也是声像定位的通用计算方式。
HRTF — 这代表“头相关传递函数”,它会考虑人头对声音定位的影响。
非常巧妙。让我们使用 HRTF 模型!
const panningModel = "HRTF";
coneInnerAngle 和 coneOuterAngle 属性指定声音从哪里发出。默认情况下,两者都是 360 度。我们的 Boombox 扬声器将具有较小的锥形,我们可以进行定义。内锥是增益(音量)始终模拟最大值的地方,外锥是增益开始衰减的地方。增益会根据 coneOuterGain 的值进行衰减。让我们创建常量来存储我们稍后将用于这些参数的值。
const innerCone = 60;
const outerCone = 90;
const outerGain = 0.3;
下一个参数是 distanceModel — 它只能设置为 linear、inverse 或 exponential。这些是不同的算法,用于在音频源远离监听者时降低其音量。我们将使用 linear,因为它很简单。
const distanceModel = "linear";
我们可以设置声源和监听者之间的最大距离(maxDistance)——如果声源进一步远离此点,音量将不再降低。这很有用,因为您可能会发现您想模拟距离,但音量会下降,而您实际上不想要这样。默认值为 10,000(无单位的相对值)。我们可以保持此值。
const maxDistance = 10000;
还有一个参考距离(refDistance),用于距离模型。我们也可以将其保留为默认值 1。
const refDistance = 1;
然后是衰减因子(rolloffFactor)——当 Panner 远离监听者时,音量降低的速度有多快。默认值为 1;我们将其设置得更大一些,以夸大我们的移动。
const rollOff = 10;
现在我们可以开始设置 Boombox 的位置和方向了。这与我们设置监听者的方式非常相似。这些也是当我们在界面上操作控件时将要更改的参数。
const positionX = posX;
const positionY = posY;
const positionZ = posZ;

const orientationX = 0.0;
const orientationY = 0.0;
const orientationZ = -1.0;
请注意我们 Z 轴方向的负值——这会将 Boombox 设置为朝向我们。正值会将声源设置为背离我们。
让我们使用相关的构造函数来创建我们的 PannerNode,并将上面设置的所有参数传递进去。
const panner = new PannerNode(audioCtx, {
  panningModel,
  distanceModel,
  positionX,
  positionY,
  positionZ,
  orientationX,
  orientationY,
  orientationZ,
  refDistance,
  maxDistance,
  rolloffFactor: rollOff,
  coneInnerAngle: innerCone,
  coneOuterAngle: outerCone,
  coneOuterGain: outerGain,
});
移动 Boombox
现在我们要将 Boombox 在我们的“房间”里移动。我们已经设置了一些控件来实现这一点。我们可以左右、上下、前后移动它;我们也可以旋转它。声音方向来自 Boombox 前面的扬声器,因此当我们旋转它时,我们可以改变声音的方向——也就是说,当 Boombox 旋转 180 度并背对着我们时,让它朝向后方播放。
我们需要为界面设置一些东西。首先,我们将获取我们要移动的元素的引用,然后我们将存储当我们设置 CSS transforms 来实际执行移动时要更改的值的引用。最后,我们将设置一些边界,以免 Boombox 在任何方向上移动过远。
const moveControls = document
  .querySelector("#move-controls")
  .querySelectorAll("button");
const boombox = document.querySelector(".boombox-body");

// the values for our CSS transforms
const transform = {
  xAxis: 0,
  yAxis: 0,
  zAxis: 0.8,
  rotateX: 0,
  rotateY: 0,
};

// set our bounds
const topBound = -posY;
const bottomBound = posY;
const rightBound = posX;
const leftBound = -posX;
const innerBound = 0.1;
const outerBound = 1.5;
让我们创建一个函数,该函数以移动方向作为参数,并修改 CSS transform 并更新 PannerNode 属性的位置和方向值,以相应地改变声音。
首先,让我们看一下我们的左、右、上、下值,因为它们相当直接。我们将沿着这些轴移动 Boombox 并更新相应的位置。
function moveBoombox(direction) {
  switch (direction) {
    case "left":
      if (transform.xAxis > leftBound) {
        transform.xAxis -= 5;
        panner.positionX.value -= 0.1;
      }
      break;
    case "up":
      if (transform.yAxis > topBound) {
        transform.yAxis -= 5;
        panner.positionY.value -= 0.3;
      }
      break;
    case "right":
      if (transform.xAxis < rightBound) {
        transform.xAxis += 5;
        panner.positionX.value += 0.1;
      }
      break;
    case "down":
      if (transform.yAxis < bottomBound) {
        transform.yAxis += 5;
        panner.positionY.value += 0.3;
      }
      break;
  }
}
我们的向前和向后移动值也类似。
switch (direction) {
  // …
  case "back":
    if (transform.zAxis > innerBound) {
      transform.zAxis -= 0.01;
      panner.positionZ.value += 40;
    }
    break;
  case "forward":
    if (transform.zAxis < outerBound) {
      transform.zAxis += 0.01;
      panner.positionZ.value -= 40;
    }
    break;
}
然而,我们的旋转值涉及更多内容,因为我们需要围绕物体移动声音。我们不仅要更新两个轴的值(例如,如果您围绕 X 轴旋转一个对象,则更新该对象的 Y 和 Z 坐标),而且还需要为此进行更多数学计算。旋转是一个圆,我们需要 Math.sin 和 Math.cos 来帮助我们绘制这个圆。
让我们设置一个旋转速率,稍后在计算旋转 Boombox 时的新坐标时,我们将将其转换为弧度范围值以用于 Math.sin 和 Math.cos。
// Set up rotation constants
const rotationRate = 60; // Bigger number equals slower sound rotation

const q = Math.PI / rotationRate; // Rotation increment in radians
我们也可以使用这个来计算旋转的度数,这将有助于我们创建的 CSS transforms(请注意,CSS transforms 需要 X 和 Y 轴)。
// Get degrees for CSS
const degreesX = (q * 180) / Math.PI;
const degreesY = (q * 180) / Math.PI;
让我们以左旋转为例。我们需要更改 Panner 坐标的 X 和 Z 方向,以便围绕 Y 轴进行左旋转。
switch (direction) {
  // …
  case "rotate-left":
    transform.rotateY -= degreesY;

    // 'left' is rotation about y-axis with negative angle increment
    z =
      panner.orientationZ.value * Math.cos(q) -
      panner.orientationX.value * Math.sin(q);
    x =
      panner.orientationZ.value * Math.sin(q) +
      panner.orientationX.value * Math.cos(q);
    y = panner.orientationY.value;

    panner.orientationX.value = x;
    panner.orientationY.value = y;
    panner.orientationZ.value = z;
    break;
}
这确实有点令人困惑,但我们正在做的是使用 sin 和 cos 来帮助我们计算 Boombox 旋转所需的坐标的圆形运动。
我们可以对所有轴执行此操作。我们只需要选择正确的方向进行更新,以及是否需要正增量或负增量。
switch (direction) {
  // …
  case "rotate-right":
    transform.rotateY += degreesY;
    // 'right' is rotation about y-axis with positive angle increment
    z =
      panner.orientationZ.value * Math.cos(-q) -
      panner.orientationX.value * Math.sin(-q);
    x =
      panner.orientationZ.value * Math.sin(-q) +
      panner.orientationX.value * Math.cos(-q);
    y = panner.orientationY.value;
    panner.orientationX.value = x;
    panner.orientationY.value = y;
    panner.orientationZ.value = z;
    break;
  case "rotate-up":
    transform.rotateX += degreesX;
    // 'up' is rotation about x-axis with negative angle increment
    z =
      panner.orientationZ.value * Math.cos(-q) -
      panner.orientationY.value * Math.sin(-q);
    y =
      panner.orientationZ.value * Math.sin(-q) +
      panner.orientationY.value * Math.cos(-q);
    x = panner.orientationX.value;
    panner.orientationX.value = x;
    panner.orientationY.value = y;
    panner.orientationZ.value = z;
    break;
  case "rotate-down":
    transform.rotateX -= degreesX;
    // 'down' is rotation about x-axis with positive angle increment
    z =
      panner.orientationZ.value * Math.cos(q) -
      panner.orientationY.value * Math.sin(q);
    y =
      panner.orientationZ.value * Math.sin(q) +
      panner.orientationY.value * Math.cos(q);
    x = panner.orientationX.value;
    panner.orientationX.value = x;
    panner.orientationY.value = y;
    panner.orientationZ.value = z;
    break;
}
最后一件事——我们需要更新 CSS 并保留鼠标事件上次移动的引用。这是最终的 moveBoombox 函数。
function moveBoombox(direction, prevMove) {
  switch (direction) {
    case "left":
      if (transform.xAxis > leftBound) {
        transform.xAxis -= 5;
        panner.positionX.value -= 0.1;
      }
      break;
    case "up":
      if (transform.yAxis > topBound) {
        transform.yAxis -= 5;
        panner.positionY.value -= 0.3;
      }
      break;
    case "right":
      if (transform.xAxis < rightBound) {
        transform.xAxis += 5;
        panner.positionX.value += 0.1;
      }
      break;
    case "down":
      if (transform.yAxis < bottomBound) {
        transform.yAxis += 5;
        panner.positionY.value += 0.3;
      }
      break;
    case "back":
      if (transform.zAxis > innerBound) {
        transform.zAxis -= 0.01;
        panner.positionZ.value += 40;
      }
      break;
    case "forward":
      if (transform.zAxis < outerBound) {
        transform.zAxis += 0.01;
        panner.positionZ.value -= 40;
      }
      break;
    case "rotate-left":
      transform.rotateY -= degreesY;

      // 'left' is rotation about y-axis with negative angle increment
      z =
        panner.orientationZ.value * Math.cos(q) -
        panner.orientationX.value * Math.sin(q);
      x =
        panner.orientationZ.value * Math.sin(q) +
        panner.orientationX.value * Math.cos(q);
      y = panner.orientationY.value;

      panner.orientationX.value = x;
      panner.orientationY.value = y;
      panner.orientationZ.value = z;
      break;
    case "rotate-right":
      transform.rotateY += degreesY;
      // 'right' is rotation about y-axis with positive angle increment
      z =
        panner.orientationZ.value * Math.cos(-q) -
        panner.orientationX.value * Math.sin(-q);
      x =
        panner.orientationZ.value * Math.sin(-q) +
        panner.orientationX.value * Math.cos(-q);
      y = panner.orientationY.value;
      panner.orientationX.value = x;
      panner.orientationY.value = y;
      panner.orientationZ.value = z;
      break;
    case "rotate-up":
      transform.rotateX += degreesX;
      // 'up' is rotation about x-axis with negative angle increment
      z =
        panner.orientationZ.value * Math.cos(-q) -
        panner.orientationY.value * Math.sin(-q);
      y =
        panner.orientationZ.value * Math.sin(-q) +
        panner.orientationY.value * Math.cos(-q);
      x = panner.orientationX.value;
      panner.orientationX.value = x;
      panner.orientationY.value = y;
      panner.orientationZ.value = z;
      break;
    case "rotate-down":
      transform.rotateX -= degreesX;
      // 'down' is rotation about x-axis with positive angle increment
      z =
        panner.orientationZ.value * Math.cos(q) -
        panner.orientationY.value * Math.sin(q);
      y =
        panner.orientationZ.value * Math.sin(q) +
        panner.orientationY.value * Math.cos(q);
      x = panner.orientationX.value;
      panner.orientationX.value = x;
      panner.orientationY.value = y;
      panner.orientationZ.value = z;
      break;
  }

  boombox.style.transform =
    `translateX(${transform.xAxis}px) ` +
    `translateY(${transform.yAxis}px) ` +
    `scale(${transform.zAxis}) ` +
    `rotateY(${transform.rotateY}deg) ` +
    `rotateX(${transform.rotateX}deg)`;

  const move = prevMove || {};
  move.frameId = requestAnimationFrame(() => moveBoombox(direction, move));
  return move;
}
连接我们的控件
连接我们的控件按钮相对简单——现在我们可以监听控件上的鼠标事件并运行此函数,并在鼠标释放时停止它。
// for each of our controls, move the boombox and change the position values
moveControls.forEach((el) => {
  let moving;
  el.addEventListener("mousedown", () => {
    const direction = this.dataset.control;
    if (moving && moving.frameId) {
      cancelAnimationFrame(moving.frameId);
    }
    moving = moveBoombox(direction);
  });

  window.addEventListener("mouseup", () => {
    if (moving && moving.frameId) {
      cancelAnimationFrame(moving.frameId);
    }
  });
});
连接我们的图
我们的 HTML 包含我们要受 PannerNode 影响的音频元素。
<audio src="myCoolTrack.mp3"></audio>
我们需要从该元素中获取源,并使用 AudioContext.createMediaElementSource 将其输入 Web Audio API。
// get the audio element
const audioElement = document.querySelector("audio");

// pass it into the audio context
const track = audioContext.createMediaElementSource(audioElement);
接下来,我们必须连接我们的音频图。我们将输入(音轨)连接到我们的处理节点(Panner),再连接到我们的目的地(此处为扬声器)。
track.connect(panner).connect(audioCtx.destination);
让我们创建一个播放按钮,单击该按钮时将根据当前状态播放或暂停音频。
<button data-playing="false" role="switch">Play/Pause</button>
// Select our play button
const playButton = document.querySelector("button");

playButton.addEventListener("click", () => {
  // Check if context is in suspended state (autoplay policy)
  if (audioContext.state === "suspended") {
    audioContext.resume();
  }

  // Play or pause track depending on state
  if (playButton.dataset.playing === "false") {
    audioElement.play();
    playButton.dataset.playing = "true";
  } else if (playButton.dataset.playing === "true") {
    audioElement.pause();
    playButton.dataset.playing = "false";
  }
});
有关播放/控制音频和音频图的更深入信息,请参阅 使用 Web Audio API。
总结
希望本文能让您深入了解 Web Audio 空间化是如何工作的,以及 PannerNode 的每个属性的作用(它们很多)。值有时很难操作,根据您的用例,可能需要一些时间才能正确设置它们。
注意:不同浏览器在音频空间化效果方面存在细微差别。PannerNode 在后台执行了非常复杂的数学计算;这里有许多测试,因此您可以跟踪此节点在不同平台上的内部工作状态。
如果您正在使用 3D 游戏和/或 WebXR,最好利用 3D 库来创建此类功能,而不是从头开始尝试自己实现。我们在本文中自行实现是为了让您了解其工作原理,但利用他人已完成的工作将为您节省大量时间。