转换
在本教程的早期,我们学习了画布网格和坐标空间。到目前为止,我们只使用了默认的网格,并根据我们的需要更改了整个画布的大小。通过变换,有更强大的方法可以将原点平移到不同的位置、旋转网格甚至缩放网格。
保存和恢复状态
在查看变换方法之前,让我们先看另外两种方法,一旦你开始生成更复杂的绘图,这两种方法将是不可或缺的。
画布状态存储在堆栈中。每次调用 save() 方法时,当前绘图状态都会被推入堆栈。绘图状态包括:
- 已应用的变换(例如,
translate、rotate和scale- 见下文)。 - 以下属性的当前值
- 当前的剪裁路径,我们将在下一节中看到。
您可以根据需要多次调用 save() 方法。每次调用 restore() 方法时,都会从堆栈中弹出最后一个保存的状态,并恢复所有保存的设置。
保存和恢复画布状态的示例
function draw() {
  const ctx = document.getElementById("canvas").getContext("2d");

  ctx.fillRect(0, 0, 150, 150); // Draw a Black rectangle with default settings
  ctx.save(); // Save the original default state

  ctx.fillStyle = "#0099ff"; // Make changes to saved settings
  ctx.fillRect(15, 15, 120, 120); // Draw a Blue rectangle with new settings
  ctx.save(); // Save the current state

  ctx.fillStyle = "white"; // Make changes to saved settings
  ctx.globalAlpha = 0.5;
  ctx.fillRect(30, 30, 90, 90); // Draw a 50%-White rectangle with newest settings

  ctx.restore(); // Restore to previous state
  ctx.fillRect(45, 45, 60, 60); // Draw a rectangle with restored Blue setting

  ctx.restore(); // Restore to original state
  ctx.fillRect(60, 60, 30, 30); // Draw a rectangle with restored Black setting
}
第一步是绘制一个具有默认设置的大矩形。接下来,我们保存此状态并更改填充颜色。然后我们绘制第二个较小的蓝色矩形并保存状态。再次,我们更改一些绘图设置并绘制第三个半透明的白色矩形。
到目前为止,这与我们之前章节中的内容非常相似。然而,一旦我们调用第一个 restore() 语句,顶部绘图状态就会从堆栈中移除,设置也会被恢复。如果我们没有使用 save() 保存状态,我们就需要手动更改填充颜色和透明度才能返回到之前的状态。对于两个属性来说这很简单,但如果我们有更多属性,我们的代码会很快变得非常冗长。
当调用第二个 restore() 语句时,原始状态(我们在第一次调用 save 之前设置的状态)将被恢复,最后一个矩形将再次以黑色绘制。
平移
我们将要查看的第一个变换方法是 translate()。此方法用于将画布及其原点移动到网格中的不同点。
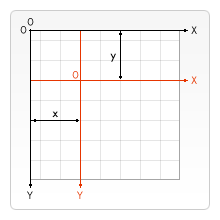
translate(x, y)-
在网格上移动画布及其原点。
x表示水平移动的距离,y表示垂直移动网格的距离。
在进行任何变换之前保存画布状态是一个好主意。在大多数情况下,调用 restore 方法比执行反向平移以返回原始状态要容易得多。此外,如果您在循环中进行平移而不保存和恢复画布状态,您可能会丢失部分绘图,因为它绘制到了画布边缘之外。
translate 示例
此示例演示了平移画布原点的一些好处。如果没有 translate() 方法,所有矩形都将绘制在相同的位置 (0,0)。translate() 方法还使我们能够将矩形放置在画布上的任何位置,而无需在 fillRect() 函数中手动调整坐标。这使其更容易理解和使用。
在 draw() 函数中,我们使用两个 for 循环调用 fillRect() 函数九次。在每个循环中,画布都会被平移,绘制矩形,然后画布会恢复到其原始状态。请注意 fillRect() 的调用每次都使用相同的坐标,依靠 translate() 来调整绘图位置。
function draw() {
  const ctx = document.getElementById("canvas").getContext("2d");
  for (let i = 0; i < 3; i++) {
    for (let j = 0; j < 3; j++) {
      ctx.save();
      ctx.fillStyle = `rgb(${51 * i} ${255 - 51 * i} 255)`;
      ctx.translate(10 + j * 50, 10 + i * 50);
      ctx.fillRect(0, 0, 25, 25);
      ctx.restore();
    }
  }
}
旋转
第二个变换方法是 rotate()。我们使用它围绕当前原点旋转画布。
rotate(angle)-
围绕当前原点以
angle弧度顺时针旋转画布。
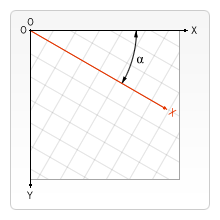
旋转中心点始终是画布原点。要更改中心点,我们需要使用 translate() 方法移动画布。
rotate 示例
在此示例中,我们将使用 rotate() 方法,首先围绕画布原点旋转一个矩形,然后借助 translate() 围绕矩形中心旋转。
注意:角度以弧度为单位,而不是度。要进行转换,我们使用:radians = (Math.PI/180)*degrees。
function draw() {
  const ctx = document.getElementById("canvas").getContext("2d");

  // left rectangles, rotate from canvas origin
  ctx.save();
  // blue rect
  ctx.fillStyle = "#0095DD";
  ctx.fillRect(30, 30, 100, 100);
  ctx.rotate((Math.PI / 180) * 25);
  // grey rect
  ctx.fillStyle = "#4D4E53";
  ctx.fillRect(30, 30, 100, 100);
  ctx.restore();

  // right rectangles, rotate from rectangle center
  // draw blue rect
  ctx.fillStyle = "#0095DD";
  ctx.fillRect(150, 30, 100, 100);

  ctx.translate(200, 80); // translate to rectangle center
  // x = x + 0.5 * width
  // y = y + 0.5 * height
  ctx.rotate((Math.PI / 180) * 25); // rotate
  ctx.translate(-200, -80); // translate back

  // draw grey rect
  ctx.fillStyle = "#4D4E53";
  ctx.fillRect(150, 30, 100, 100);
}
要围绕矩形自身中心旋转矩形,我们将画布平移到矩形中心,然后旋转画布,然后将画布平移回 0,0,然后绘制矩形。
缩放
下一个变换方法是缩放。我们使用它来增加或减少画布网格中的单位。这可用于绘制缩小或放大的形状和位图。
scale(x, y)-
在水平方向上按 x,在垂直方向上按 y 缩放画布单位。这两个参数都是实数。小于 1.0 的值会减小单位大小,大于 1.0 的值会增大单位大小。值为 1.0 时单位大小不变。
使用负数可以实现轴镜像(例如,使用 translate(0,canvas.height); scale(1,-1); 将获得众所周知的笛卡尔坐标系,原点位于左下角)。
默认情况下,画布上的一个单位正好是一个像素。如果我们应用,例如,缩放因子 0.5,则生成的单位将是 0.5 像素,因此形状将以一半大小绘制。类似地,将缩放因子设置为 2.0 将增加单位大小,一个单位现在变成两个像素。这会导致形状以两倍大小绘制。
scale 示例
在最后一个示例中,我们将绘制具有不同缩放因子的形状。
function draw() {
  const ctx = document.getElementById("canvas").getContext("2d");

  // draw a simple rectangle, but scale it.
  ctx.save();
  ctx.scale(10, 3);
  ctx.fillRect(1, 10, 10, 10);
  ctx.restore();

  // mirror horizontally
  ctx.scale(-1, 1);
  ctx.font = "48px serif";
  ctx.fillText("MDN", -135, 120);
}
变换
最后,以下变换方法允许直接修改变换矩阵。
transform(a, b, c, d, e, f)-
将当前变换矩阵与由其参数描述的矩阵相乘。变换矩阵由以下公式描述:
如果任何参数为
Infinity,则变换矩阵必须标记为无穷大,而不是方法抛出异常。
此函数的参数是:
a(m11)-
水平缩放。
b(m12)-
水平倾斜。
c(m21)-
垂直倾斜。
d(m22)-
垂直缩放。
e(dx)-
水平移动。
f(dy)-
垂直移动。
setTransform(a, b, c, d, e, f)-
将当前变换重置为单位矩阵,然后使用相同的参数调用
transform()方法。这基本上是在一步中撤销当前变换,然后设置指定的变换。 resetTransform()-
将当前变换重置为单位矩阵。这等同于调用:
ctx.setTransform(1, 0, 0, 1, 0, 0);
transform 和 setTransform 示例
function draw() {
  const ctx = document.getElementById("canvas").getContext("2d");

  const sin = Math.sin(Math.PI / 6);
  const cos = Math.cos(Math.PI / 6);
  ctx.translate(100, 100);
  let c = 0;
  for (let i = 0; i <= 12; i++) {
    c = Math.floor((255 / 12) * i);
    ctx.fillStyle = `rgb(${c} ${c} ${c})`;
    ctx.fillRect(0, 0, 100, 10);
    ctx.transform(cos, sin, -sin, cos, 0, 0);
  }

  ctx.setTransform(-1, 0, 0, 1, 100, 100);
  ctx.fillStyle = "rgb(255 128 255 / 50%)";
  ctx.fillRect(0, 50, 100, 100);
}