Ember 应用结构和组件化
在本文中,我们将直接开始规划 TodoMVC Ember 应用的结构,添加 HTML,然后将 HTML 结构分解成组件。
| 先决条件 |
至少,建议您熟悉核心HTML、CSS和JavaScript语言,并了解终端/命令行。 更深入地了解现代 JavaScript 特性(如类、模块等)将非常有益,因为 Ember 大量使用它们。 |
|---|---|
| 目标 | 学习如何构建 Ember 应用程序,然后将其结构分解成组件。 |
规划 TodoMVC 应用的布局
在上一篇文章中,我们设置了一个新的 Ember 项目,然后添加并配置了 CSS 样式。现在,我们将添加一些 HTML,规划 TodoMVC 应用程序的结构和语义。
应用程序的登录页面 HTML 定义在 app/templates/application.hbs 中。它已经存在,其内容目前如下所示
{{!-- The following component displays Ember's default welcome message. --}}
<WelcomePage />
{{!-- Feel free to remove this! --}}

{{outlet}}
<WelcomePage /> 是 Ember 附加组件提供的一个组件,它渲染我们在上一篇文章中第一次导航到 localhost:4200 上的服务器时看到的默认欢迎页面。
但是,我们不需要它。相反,我们希望它包含 TodoMVC 应用程序结构。首先,删除 application.hbs 的内容,并将其替换为以下内容
<section class="todoapp">
  <h1>todos</h1>
  <input
    class="new-todo"
    aria-label="What needs to be done?"
    placeholder="What needs to be done?"
    autofocus />
</section>
注意:aria-label 为辅助技术提供了一个标签,以供使用 - 例如,用于屏幕阅读器读出。在以下情况下,这很有用:我们有一个 <input>,但没有相应的 HTML 文本可以转换为标签。
保存 application.hbs 后,您之前启动的开发服务器将自动重新构建应用程序并刷新浏览器。渲染后的输出应该看起来像这样
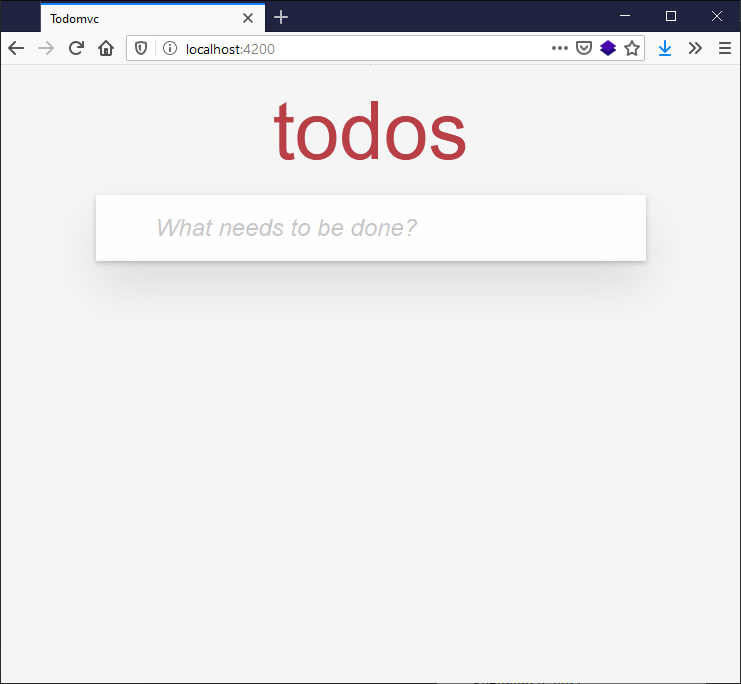
让我们的 HTML 看起来像一个功能齐全的待办事项列表应用程序并不需要太多努力。再次更新 application.hbs 文件,使其内容如下所示
<section class="todoapp">
  <h1>todos</h1>
  <input
    class="new-todo"
    aria-label="What needs to be done?"
    placeholder="What needs to be done?"
    autofocus />

  <section class="main">
    <input id="mark-all-complete" class="toggle-all" type="checkbox" />
    <label for="mark-all-complete">Mark all as complete</label>

    <ul class="todo-list">
      <li>
        <div class="view">
          <input
            aria-label="Toggle the completion of this todo"
            class="toggle"
            type="checkbox" />
          <label>Buy Movie Tickets</label>
          <button
            type="button"
            class="destroy"
            title="Remove this todo"></button>
        </div>

        <input autofocus class="edit" value="Todo Text" />
      </li>

      <li>
        <div class="view">
          <input
            aria-label="Toggle the completion of this todo"
            class="toggle"
            type="checkbox" />
          <label>Go to Movie</label>
          <button
            type="button"
            class="destroy"
            title="Remove this todo"></button>
        </div>

        <input autofocus class="edit" value="Todo Text" />
      </li>
    </ul>
  </section>

  <footer class="footer">
    <span class="todo-count"> <strong>0</strong> todos left </span>

    <ul class="filters">
      <li>
        <a href="#">All</a>
        <a href="#">Active</a>
        <a href="#">Completed</a>
      </li>
    </ul>

    <button type="button" class="clear-completed">Clear Completed</button>
  </footer>
</section>
渲染后的输出现在应该是如下所示
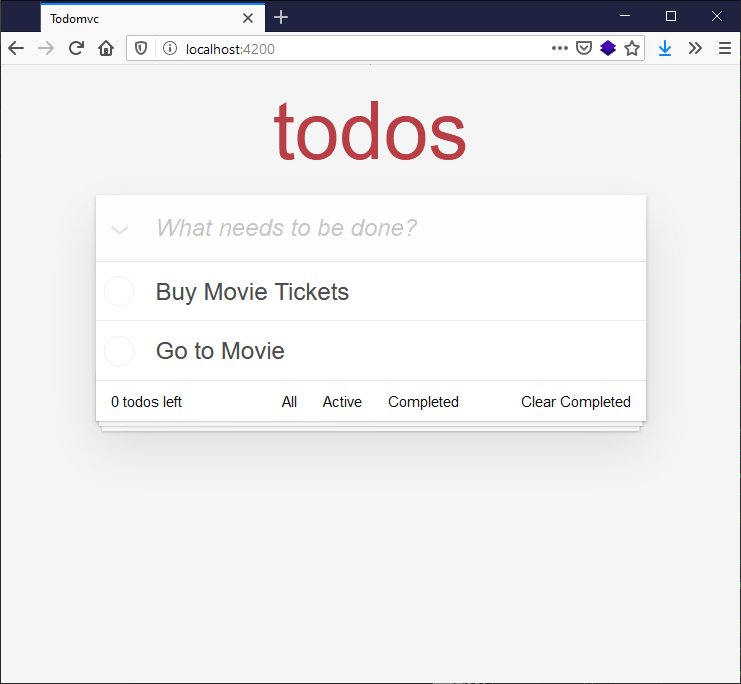
这看起来很完整,但请记住,这只是一个静态原型。现在我们需要将 HTML 代码分解成动态组件;稍后我们将将其变成一个完全交互式的应用程序。
查看与渲染的待办事项应用程序相邻的代码,我们可以选择几种方式来分解 UI,但让我们计划将 HTML 分成以下组件
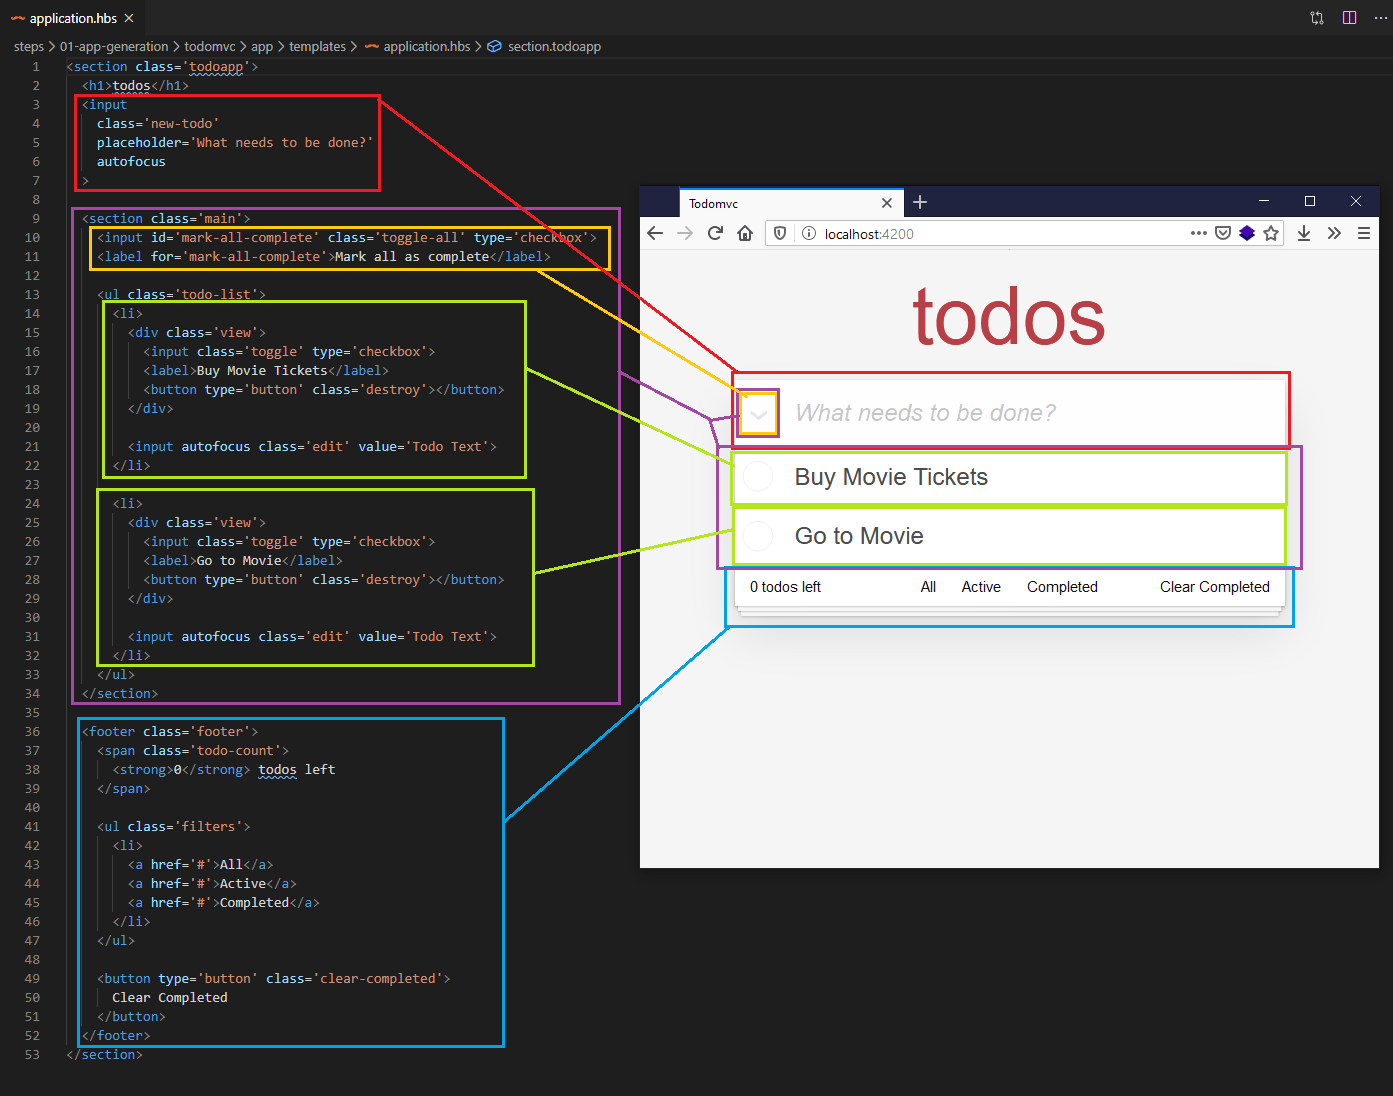
组件分组如下所示
- 主要输入 / "new-todo"(图像中红色)
- 待办事项列表的包含主体 +
mark-all-complete按钮(图像中紫色)mark-all-complete按钮,出于下面给出的原因明确突出显示(图像中黄色)- 每个待办事项都是一个单独的组件(图像中绿色)
- 页脚(图像中蓝色)
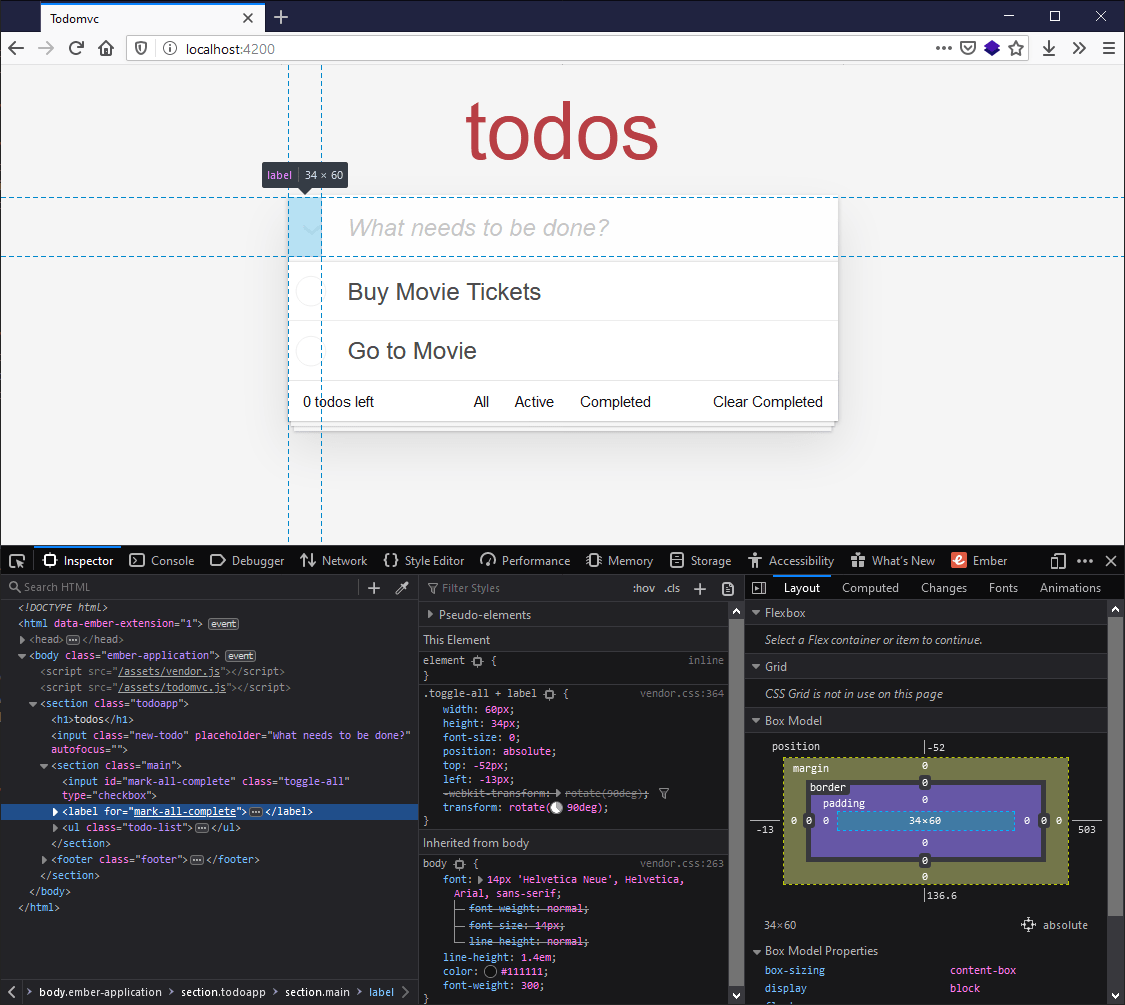
值得注意的是,mark-all-complete 复选框(以黄色标记),虽然在“main”部分,但渲染在“new-todo”输入旁边。这是因为默认的 CSS 使用负顶部和左侧值绝对定位复选框 + 标签,以将其移动到输入旁边,而不是将其放在“main”部分中。
使用 CLI 为我们创建组件
因此,为了表示我们的应用程序,我们希望创建 4 个组件
- 标题
- 列表
- 单个待办事项
- 页脚
要创建组件,我们使用 ember generate component 命令,后跟组件的名称。让我们先创建标题组件。为此
- 通过进入终端并按下 Ctrl + C 停止运行的服务器。
- 在终端中输入以下命令这些将生成一些新文件,如生成的终端输出所示bash
ember generate component headerinstalling component create app/components/header.hbs skip app/components/header.js tip to add a class, run `ember generate component-class header` installing component-test create tests/integration/components/header-test.js
header.hbs 是模板文件,我们将包含该组件的 HTML 结构。稍后,我们将添加所需的动态功能,例如数据绑定、响应用户交互等。
注意:header.js 文件(显示为已跳过)用于连接到后备 Glimmer 组件类,我们现在不需要它,因为它们用于添加交互性和状态操作。默认情况下,generate component 会生成仅模板组件,因为在大型应用程序中,仅模板组件最终会成为大多数组件。
header-test.js 用于编写自动化测试,以确保我们的应用程序随着时间的推移(例如,在我们升级、添加功能、重构等时)继续工作。测试超出了本教程的范围,尽管通常应该在开发时实施测试,而不是之后,否则很容易被遗忘。如果您对测试感兴趣,或者想知道为什么您可能想要进行自动化测试,请查看官方 Ember 测试教程。
在我们开始添加任何组件代码之前,让我们创建其他组件的脚手架。在终端中逐行输入以下内容
ember generate component todo-list
ember generate component todo
ember generate component footer
您现在将在 todomvc/app/components 目录中看到以下内容
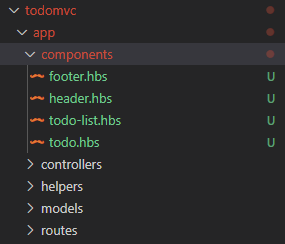
现在我们已经拥有了所有组件结构文件,我们可以将每个组件的 HTML 从 application.hbs 文件中剪切并粘贴到每个组件中,然后重新编写 application.hbs 以反映我们新的抽象。
header.hbs文件应更新为包含以下内容html<input class="new-todo" aria-label="What needs to be done?" placeholder="What needs to be done?" autofocus />todo-list.hbs应更新为包含以下代码块html<section class="main"> <input id="mark-all-complete" class="toggle-all" type="checkbox" /> <label for="mark-all-complete">Mark all as complete</label> <ul class="todo-list"> <Todo /> <Todo /> </ul> </section>注意:此新
todo-list.hbs中唯一不是 HTML 的内容是<Todo />组件调用。在 Ember 中,组件调用类似于声明 HTML 元素,但第一个字母以大写字母开头,并且名称使用 驼峰式大小写 编写,如您在<TodoList />中所见。下面todo.hbs文件的内容将替换渲染页面中的<Todo />,因为我们的应用程序正在加载。- 将以下内容添加到
todo.hbs文件中html<li> <div class="view"> <input aria-label="Toggle the completion of this todo" class="toggle" type="checkbox" /> <label>Buy Movie Tickets</label> <button type="button" class="destroy" title="Remove this todo"></button> </div> <input autofocus class="edit" value="Todo Text" /> </li> footer.hbs应更新为包含以下内容html<footer class="footer"> <span class="todo-count"> <strong>0</strong> todos left </span> <ul class="filters"> <li> <a href="#">All</a> <a href="#">Active</a> <a href="#">Completed</a> </li> </ul> <button type="button" class="clear-completed">Clear Completed</button> </footer>- 最后,
application.hbs的内容应更新为调用相应的组件,如下所示hbs<section class="todoapp"> <h1>todos</h1> <Header /> <TodoList /> <Footer /> </section> - 在完成这些更改后,再次在终端中运行
npm start,然后前往https://:4200,以确保待办事项应用程序的外观与重构之前相同。
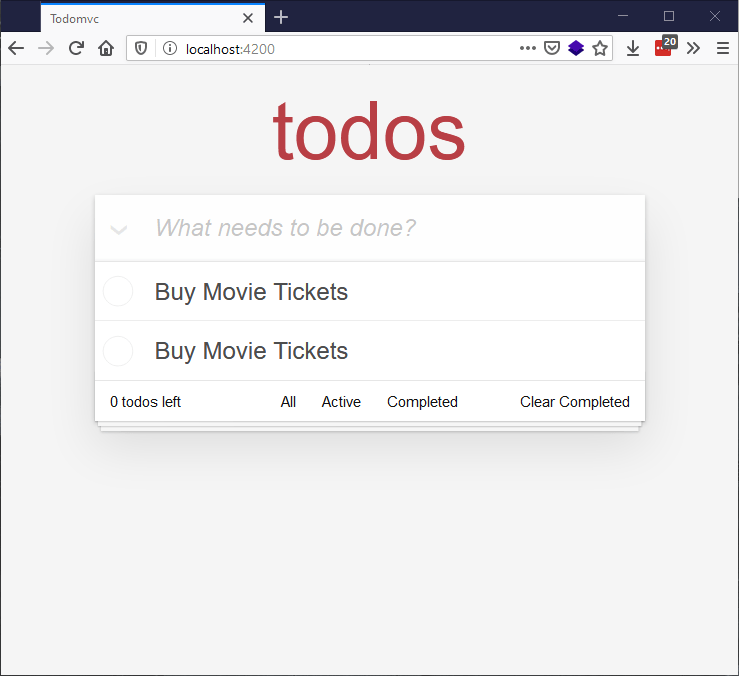
注意,待办事项项都显示为“购买电影票” - 这是因为同一个组件被调用了两次,并且待办事项文本被硬编码到其中。我们将在下一篇文章中探讨如何显示不同的待办事项项!